Basic System Management
This section will cover some basic system management in Linux.
Table of Contents
- Introduction
- User Management
- Package Management
- Services and Process Management
- Managing Services with Systemctl
- Managing Processes
- Executing Multiple Commands
- Task Scheduling
- Systemd
- Cron
- Network Management
- Backup Management
- Rsync
- File System Management
- Disks and Drives
- Mounting
- Swap Space
Introduction
It is crucial to know basic management such as creating a user, updating a system, or backing up a system. This can be critical as it can help maintain the overall useability of the system for different users and in some cases, enhance security by updating regularly.
Note that the commands used in this section are tested on Debian. Other distributions may differ slightly.
User Management
The following are some useful commands for user management.
| Command | Description |
|---|---|
| sudo | Execute commands as the root or a different user. |
| su | Login as a different user in the command line. |
| useradd/adduser | Create a new user or update the default new user information. |
| userdel | Delete the specified user and related files. |
| usermod | Modify a user account. |
| addgroup | Add a new group to the system. |
| delgroup | Remove a group from the system |
| passwd | Change the current or specified user account password. |
To add a user, we can use the adduser command. The following command will create a new user as well as adding a home directory for the user.
sudo adduser <username>
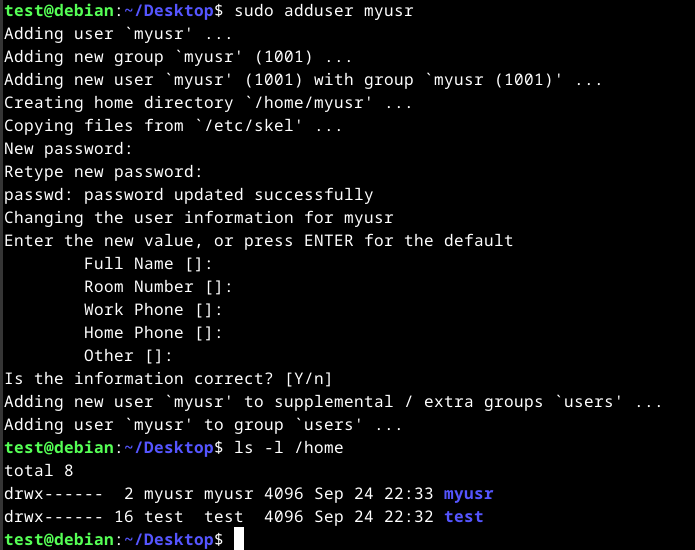
To change the password of a user, we can use the passwd command. Using the command will change the current user's password while specifying a user will change the specified user password.
passwd
sudo passwd <username>
Package Management
It is crucial to understand how to maintain a Linux system. To do this, we use tools called package managers. Package managers provides various ways to install, update, or remove packages on a system.
Packages are archives that contain binaries of software, configuration files, information about dependencies and keep track of updates and upgrades. It is similar to updating and maintaining a Windows machine.
Some features that are provided when using package management systems are:
- Package downloading
- Dependency resolution
- A standard binary package format
- Common installation and configuration locations
- Additional system-related configuration and functionality
- Quality control
There are many different package management that cover different types of files and distributions such as .deb for Debian-based distributions or .rpm for RPM-based distributions.
The following are some package managers that can be found and used.
| Command | Description |
|---|---|
| dpkg | Used to install, build, remove, and manage Debian packages. A more user-friendly interface for this is aptitude. |
| apt | Provides a high-level command-line interface for Debian-based distros. |
| aptitude | An alternative to apt. Provides a high-level interface to the package manager. |
| dnf | Used to manage packages on RPM-based distros such as Fedora and RHEL. |
| zypper | Used to manage packages on SUSE Enterprise Linux or openSUSE. |
| flatpak | Used to manage packages from the Flatpak repositories. |
| snap | Used to manage packages for Snap. |
| gem | Front-end to RubyGems, the standard package manager for Ruby. |
| pip | A Python package installer. It is recommended to use this for installing Python packages. It can work with version control repositories such as Git, Mercurial, and Bazaar. |
| git | Git is a fast, scalable, distributed revision control system. An example of using Git is using GitHub, which is a service built to run using Git. |
On Debian-based systems, we can use the Advanced Package Manager (apt). A package is an archive file containing multiple .deb files in this case. APT makes it easier and more efficient to manage packages when compared to dpkg.
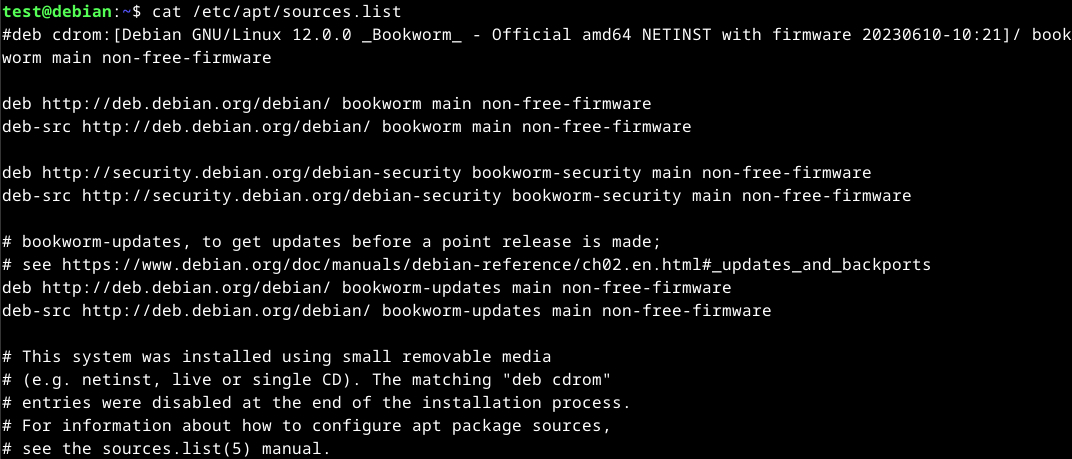
The main repositories can be different depending on the Linux distribution. However, the sources can be found in the /etc/apt/sources.list files. To add or remove repositories, it will usually be done in that file.
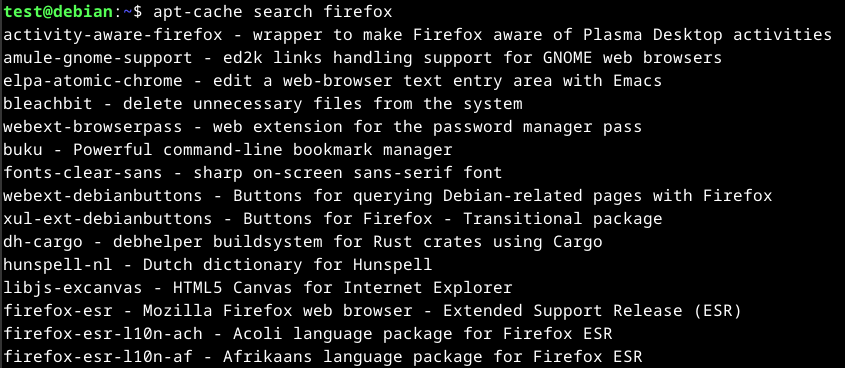
APT uses a database called the APT cache. This is used to provide information about packages installed on our system offline.
apt-cache search <package>
An example will be searching for Firefox.
apt-cache search firefox
To view additional information on a package, we can use the show option with apt-cache.
apt-cache show <package>
To view installed packages, we can use the following.
apt list --installed
To install packages, we can use the following.
apt install <package>
Services and Process Management
In Linux, there are generally two types of services. The first will be internal services. These are the relevant services that are required at system start up.
The second will be services installed by the user. These are usually all server services and such services run in the background without any user interaction. These services are called daemons and are identified by the letter d at the end of the program name. Some examples will be systemd, sshd, or journald.
Managing Services with Systemctl
To manage services such as starting and stopping, we can use systemctl. The following will be the basic usage for systemctl.
systemctl <option> <service name>
To view the status of a service, we can use the status option.
systemctl status <service>
To start a service, we can use the start option. An example will be starting SSH.
sudo systemctl start ssh
To stop a service, we can use the stop option.
sudo systemctl stop <service>
To add a service to the SysV script, we can use the enable option. This allows a service to run after system start up, allowing it to auto run when the system boots.
sudo systemctl enable <service>
To view all services running, we can use the following.
systemctl list-units --type=service
Managing Processes
A process can have the following states:
- Running
- Waiting (waiting for an event or system resource)
- Stopped
- Zombie (stopped but still has an entry in the process table)
Processes can be controlled using commands such as kill, pkill, pgrep, and killall. To interact with a process, a signal must be sent to it. To view available signals we can send, we can use the following command.
kill -l
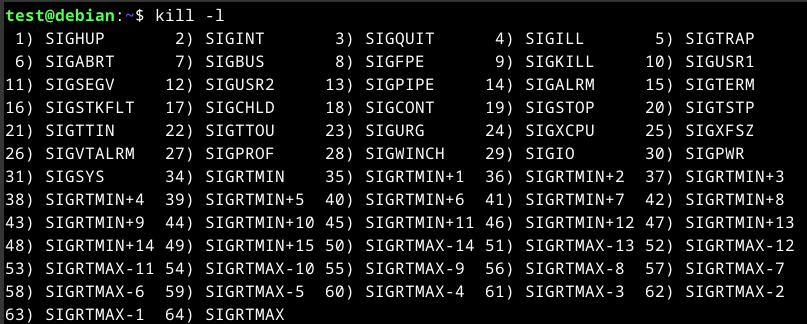
The table below will list some commonly used signals.
| Signal | Description |
|---|---|
| 1 | SIGHUP - This is sent to a process when the terminal that controls it is closed. |
| 2 | SIGINT - Sent when a user presses CTRL + C in the controlling terminal to interrupt a process. |
| 3 | SIGQUIT - Sent when a user presses CTRL + D to quit. |
| 9 | SIGKILL - Immediately kill a process with no clean-up operations. |
| 15 | SIGTERM - Program termination. |
| 19 | SIGSTOP - Stops the program. It cannot be handled anymore. |
| 20 | SIGTSTP - Sent when a user presses CTRL + Z to request for a service to suspend. It can be handled afterward. |
An example will be where a program freezes, we can use the following, specifying the process ID (PID).
kill 9 <PID>
To obtain the PID, we can use the ps aux command.
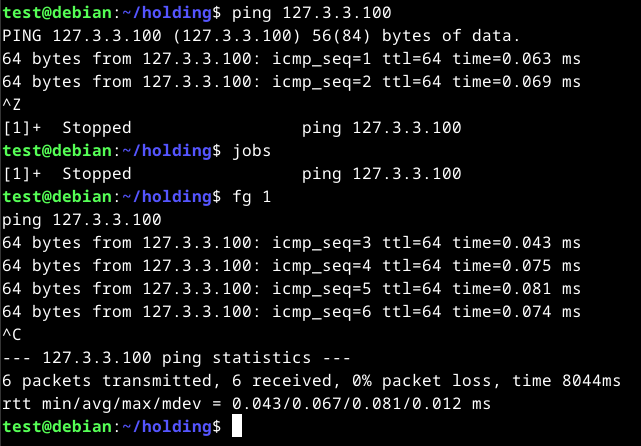
It is also possible to background running processes by pressing CTRL + Z. Doing this will send a SIGTSTP signal to the kernel, with suspends the process.
To view the background processes, we can use the jobs command. However, to keep the process running, we can use the bg <id> command or use the ampersand(&) after the command that we wish to background to keep it running.

To bring a program into the foreground, we can use the fg <id> command.
Executing Multiple Commands
It is possible to run or chain commands using the following:
;- Semicolon&&- Double ampersand|- Pipe
The different between them lies in the previous process treatment and if it was successfully completed or with errors.
The semicolon (;) is a command separator and executes the commands independently, ignoring the previous commands results and errors.
echo 'x'; echo 'y'; echo 'z'
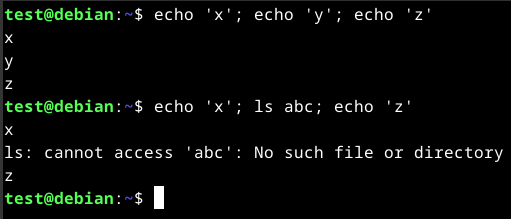
In the above screenshot, running the ls command returned an error, but did not change the output of the next command.
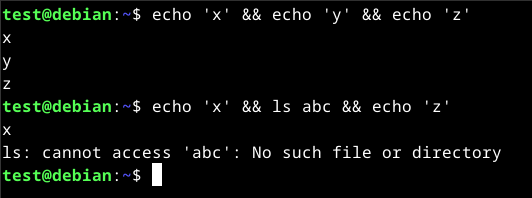
The double ampersand (&&) will only work if the previous commands have no errors. If there is an error, the following command will not execute and the whole process will stop.
The pipe (|) will use the previous commands' output in the next command. It can be used to chain commands if multiple processes are required on a single input. An example will be using grep to search for contents.
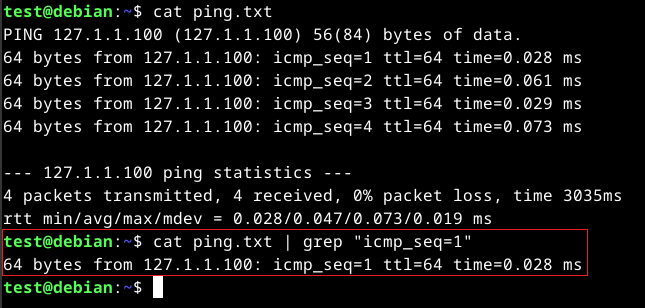
The above command will print the contents of the ping.txt file and pass it to the grep command for processing.
Task Scheduling
To run programs periodically or start them automatically on boot, we can create a task using systemd. We will require a timer and service to be created.
There are different methods such as using systemd or cronjobs.
The main difference that that with systemd, we will need to create a timer and service script that tells the operating system when to run the task. With cron, we will need to create a crontab that tells the cron daemon when to run tasks.
Systemd
To create a timer for systemd, we will need two files - a timer file (<service_name>.timer) and a service file (<service_name>.service). The files can be created in /etc/systemd/system/.
Once created, edit the timer file. We will require the [Unit], [Timer], and [Install] options. The following will be the contents of the /etc/systemd/system/<service_name>.timer file.
[Unit]
Description=My Timer Script

[Timer]
OnBootSec=3min
OnUnitActiveSec=1hour

[Install]
WantedBy=timers.target
The above will depend on how the script to be used. An example will be where if we only want the script to run once after the system boots, we can use OnBootSec in the Timer setting. However, if we want it to run at regular intervals, we can use OnUnitActiveSec instead.
Once the timer has been created, a service file is required. We will require a [Unit], [Service], and [Install] fields for it to work. The following will the contents of the /etc/systemd/system/<service_name>.service file.
[Unit]
Description=My Service Description

[Service]
ExecStart=/path/to/script/to/run/name-here.sh

[Install]
WantedBy=multi-user.target
The multi-user.target is the unit system that is activated when starting a normal multi-user mode. It defines the services that should be started on a normal system boot.
Once done, we will need to reload the daemon using the sudo systemctl daemon-reload command. Once done, we can start or optionally auto start the service using the respective commands.
sudo systemctl start <service_name>.service
sudo systemctl enable <service_name>.service
Cron
To use Cron, we will need to tell the cron daemon the time that we want our specific script to run.
For this to work, we will need to store the tasks in a file called crontab and tell the daemon when to run the tasks. The structure of Cron consists of the following:
| Column | Time Frame | Description |
|---|---|---|
| 1 | Minutes (0-59) | Specify which minute the task should be executed. |
| 2 | Hours (0-23) | Specify which hour the task should be executed. |
| 3 | Days of motnh (1-31) | Specify which day of the month the task should be executed. |
| 4 | Months (1-12) | Specify which month the task should be executed. |
| 5 | Days of the week (0-7) | Specify which day of the week the task should be executed. |
| 6 | /path/to/script.sh | Specify the path of the script to execute. |
The following is an example of the /etc/crontab file.
#Updates
* */6 * * /path/to/script.sh

#Cleanup db
0 0 * * 0 /path/to/script_clean.sh
The Updates column should execute every sixth hour. This is indicated by the */6 in the hour column. The task will be running the script.sh script where the path is provided in the last column.
The Cleanup db task will execute every Sunday at midnight. This is indicated by the 0 and 0 in the minute and hour columns and 0 in the days-of-the-month column.
Network Management
The following are some commands that can be used to manage network settings in Linux.
| Command | Description |
|---|---|
| ip | Used to display and modify network settings. New method. |
| ifconfig | Used to display and modify wired network settings. Older method. |
| iwconfig | Used to display and modify wireless network settings. Older method. |
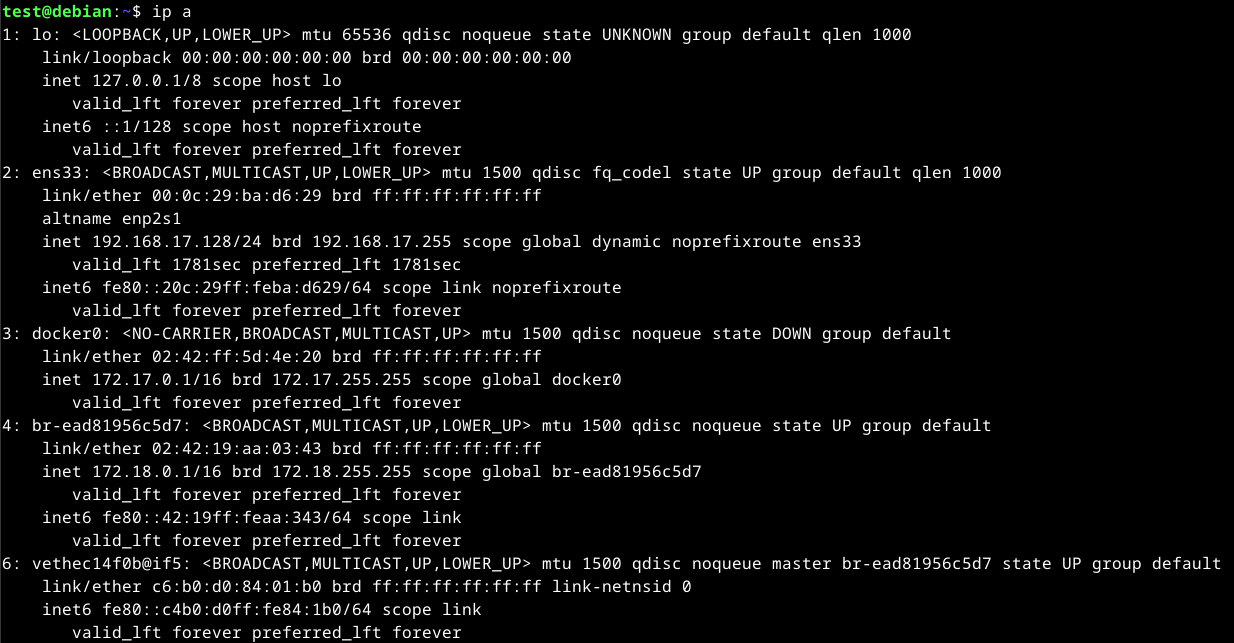
| ip address/ip a | Used to display network configuration. ip a for short. |
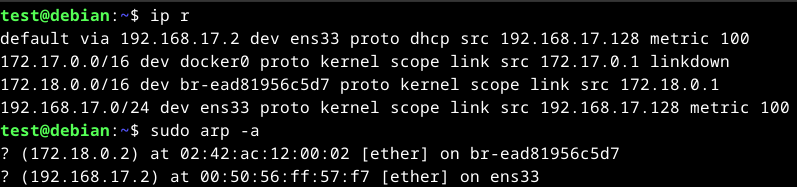
| ip route/ip r | Used to display the routing table. ip r for short. |
| arp | Used for Address Resolution Protocol (ARP) management. |
| arp -a | Used to display the ARP/CAM table. |
| ping | Test network connectivity against a host. |
| netstat | Used to identify open ports. |
| ss | Used to identify open ports. |
To display the interfaces configuration settings, we can either use ip a, ifconfig for wired connections, or iwconfig for wireless configurations. Using the ip command is newer and will display wired and wireless connections if present.
To view the routing table and CAM table, we can use ip r and arp -a respectively.
To test network connectivity to a device, we can use the ping command.
ping 192.168.17.1
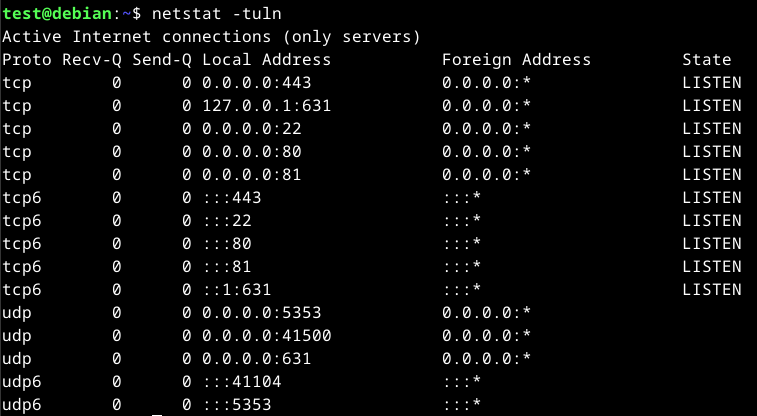
To view open ports on the system, we can use the netstat -tuln command. An alternative to this will be the ss command.
Backup Management
It is important to backup files on any system. Some reasons that we may choose to back up a file or system is to ensure that the system is recoverable in the event of a system failure such as a hard drive failing.
There are many different tools that can be used in Linux to do this. Some of them are:
- Rsync
- Deja Dup
- Duplicity
Rsync
Rsync is a open-source tools that allows us to quickly and securely back up files and directories to a remote location. It can also be used to create backups locally or on remote servers.
It is useful for transferring large amount of data over the network, as it only transmits the changed parts of a file. This is also known as incremental backup where only files that have changed since the last backup will be backed up.
To install Rsync on Linux, we can use the following command.
sudo apt install rsync
Once installed, we can use the rsync command to perform backups. An example will be backing up a local directory to a remote server.
rsync -av /path/to/local/dir <username>@<remote host>:/path/to/backup/dir
Command breakdown:
-a- Specify to archive. This option is used to preserve the original file attributes such as permissions, timestamps, etc.-v- Enable verbose to provide more detailed output./path/to/local/dir- Specify the path to the local directory to backup.<username>- Specify the username to use for authentication.<remote host>- Specify the remote host to backup to such as IP address./path/to/backup/dir- Specify the path to the remote directory to save the backup to.
To restore a backup, simply reverse the source and destination from the previous command.
rsync -av <username>@<remote host>:/path/to/backup/dir /path/to/local/dir
To use encrypted channels to transfer the files such as SSH, we can use the -e option.
rsync -avz -e ssh /path/to/local/dir <username>@<remote host>:/path/to/backup/dir
Command breakdown:
-a- Specify to archive.-v- Enable verbose mode.-z- Specify to compress the file data during the transfer.-e ssh- Specify the remote shell to use. In this example, SSH./path/to/local/dir- Specify the path to the local directory to backup.<username>- Specify the username to use on the remote host.<remote host>- Specify the remote host to backup to./patth/to/backup/dir- Specify the path to the remote directory to save the backup to.
To perform automatic backups, Cron can be used. To start, we can use the following script, which will be used by the crontab.
#!/bin/bash

rsync -avz -e ssh /path/to/local/dir <username>@<remote host>:/path/to/backup/dir
Once created, ensure that the script is executable. If it is not, use the following command.
chmod +x <script_name>.sh
Once done, we can schedule the cronjob in the /etc/crontab file. An example will be backing up files every hour at the 0th minute.
0 * * * * /path/to/script.sh
File System Management
There are many different file systems that can be used on Linux such as ext2, ext3, ext4, BTRFS, and more. Each file system offers different advantages and disadvantages and should be chosen to fit the specific needs of the system.
An example will be ext2 and BTRFS. With ext2, it is suitable for basic file system management tasks while BTRFS offers robust data integrity and snapshot capabilities.
The file system consists of various components. At the top of the structure is the inode table. This is the basis of the entire file system. It is a table that contains information associated with each file and directory on a Linux system such as metadata, permissions, size, type, owner, and more.
Disks and Drives
Disk management on Linux involves managing physical storage devices such as SSDs, HDDs, and removal storage devices. The main tool that is used for management on Linux is fdisk.
fdisk allows us to create, delete, and manage partitions on a drive as well as providing information about the partition table, size and type of each partition. Other partitioning tools on Linux are gpart and GParted.
Partitioning is where a physical storage device is divided into separate, logical sections where each partition can be formatted with a specific file system.
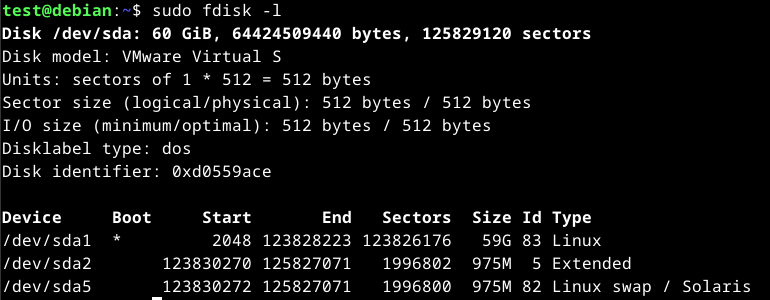
To view the disk information using fdisk, we can use the -l option.
sudo fdisk -l
Mounting
Each logical partition or drive needs to be assigned to a specific directory on Linux. This process is called "mounting". Mounting is where a drive is attached to a specific directory, making it accessible to the file system hierarchy.
Once a drive has been mounted, it can be accessed and modified as any other directory on the system.
We can use the mount tool on Linux to mount drives. To view the currently mounted file systems, we can use the mount command without any arguments.
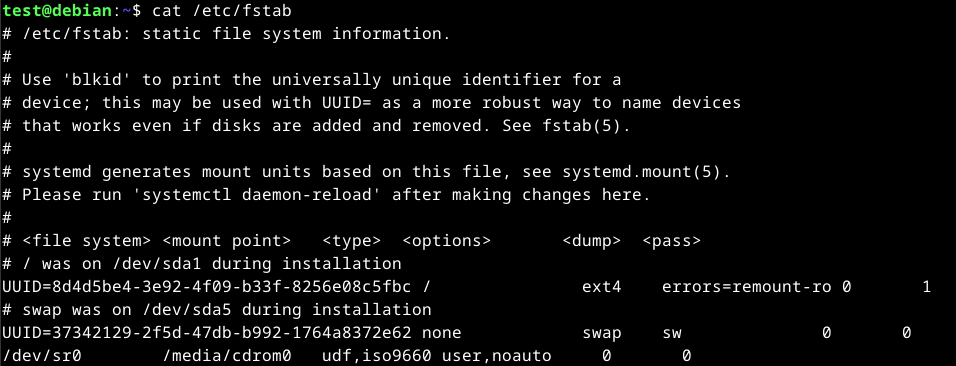
The /etc/fstab file is used to define the default file systems that are mounted at boot time.
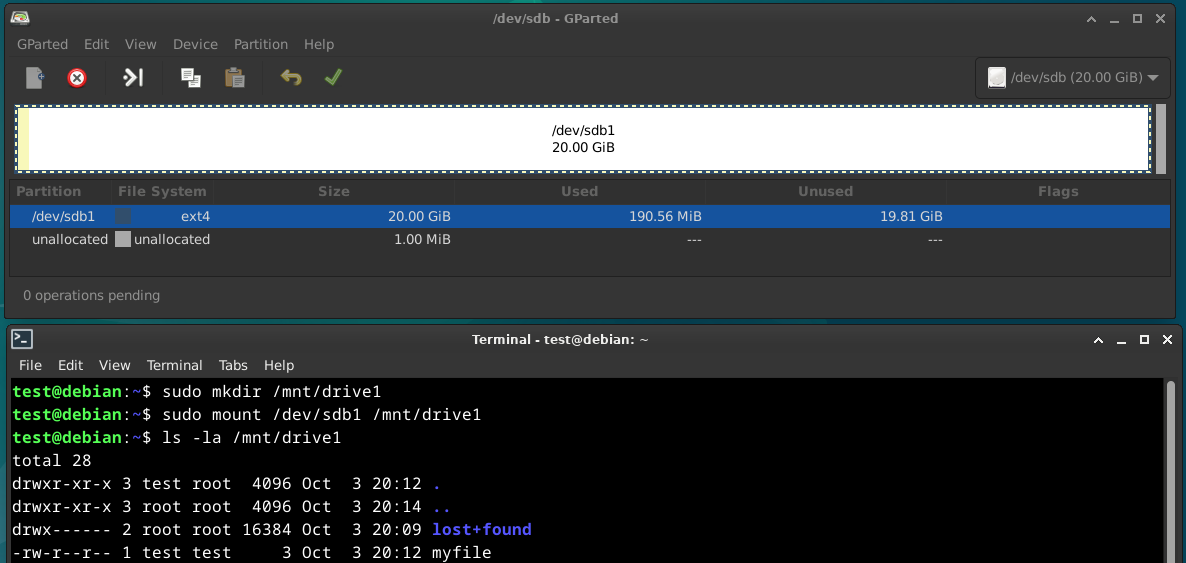
Before mounting a file system, the directory that the file system will be mounted to by using the mkdir command.
To mount file system, we can specify the device name followed by the mount point.
sudo mount /path/to/drive /path/to/mount
An example will be mounting a drive with the name /dev/sdb1 to /mnt/drive1. Note that the drive has to be formatted with a file system using tools such as gparted before mounting.
sudo mount /dev/sdb1 /mnt/drive1
To mount a NFS share, we can use the following command by specifying the NFS server IP address or hostname and local mount point.
sudo mount <remote server>:/share/path /path/to/mount
To mount a SMB share, we can use the following command by providing the remote share with the IP address or hostname and the path to mount the share locally.
sudo mount -t cifs //<remote server IP>/share/path /path/to/mount
To unmount a file system, we can use the umount command by specifying the mount location.
sudo umount /mnt/drive1
Note that sufficient permissions are required to unmount a file and that no running process is using the file system. If a process is running, it can prevent us from unmounting the file system.
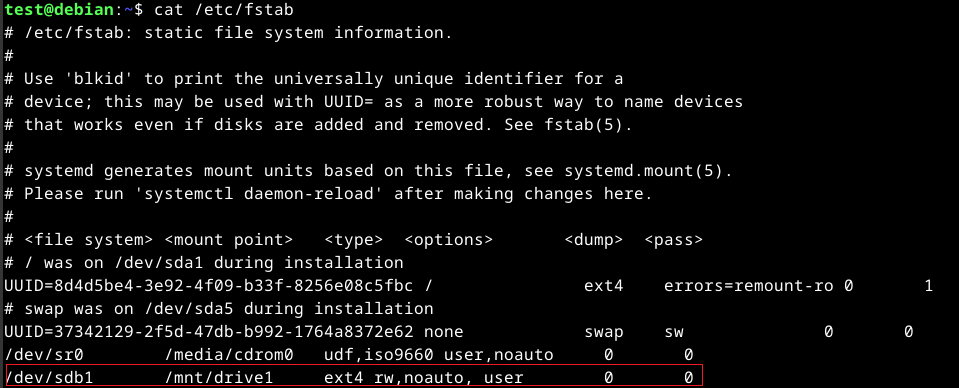
Additionally, we can also unmount a file system automatically when the system shuts down by adding an entry to the /etc/fstab file. To do this, add the noauto option. An example will be the following entry.
/dev/sdb1 /mnt/drive1 ext4 rw,noauto, user 0 0
Swap Space
Swap space is used when the system runs out of physical memory (RAM). Swap space acts as additional RAM, allowing the system to run smoothly even when there is insufficient RAM, albeit with lesser performance.
Swap space can be created during or after the operating system installation. To create it after installation, we can use commands such as mkswap and swapon. The mkswap is used to create the swap space while the swpon is used to activate it.
It is good practice to have the swap space have an equal to the amount of RAM on the system at minimum or double the number of RAM the system has. An example will be having 4GB of swap space if the system has 4GB RAM.