Docker
Docker is a container engine that can be used to manage, build, and run containers. Docker allows quick deployment of applications and a easily replicable environment. Compared to virtual machines, Docker requires less resources and can be deployed faster than virtual machines.
Docker runs a daemon called "dockerd" which allows us to have OS-level virtualisation. Containers are stateless which means that when it is stopped/shutdown, all the data inside them is gone.
Links:
Table of Contents
- Installation
- Creating a Dockerfile
- Build a Docker Image
- Creating a Container
- Managing Containers
- Docker Networking
Installation
Installation of Docker can be slightly different depending on your operating system. This guide will be using Debian Linux and the official Docker repositories. To install docker, we can use the following commands:
sudo apt-get update
sudo apt-get install ca-certificates curl
sudo install -m 0755 -d /etc/apt/keyrings
sudo curl -fsSL https://download.docker.com/linux/debian/gpg -o /etc/apt/keyrings/docker.asc
sudo chmod a+r /etc/apt/keyrings/docker.asc

echo \
  "deb [arch=$(dpkg --print-architecture) signed-by=/etc/apt/keyrings/docker.asc] https://download.docker.com/linux/debian \
  $(. /etc/os-release && echo "$VERSION_CODENAME") stable" | \
  sudo tee /etc/apt/sources.list.d/docker.list > /dev/null

sudo apt-get update
sudo apt-get install docker-ce docker-ce-cli containerd.io docker-buildx-plugin docker-compose-plugin
Once installed, use the command systemctl start docker and systemctl enable docker to start the daemon is it's not already running.
Creating a Dockerfile
To create a container, we first require a Dockerfile. A Dockerfile is a file is like a blueprint that tells Docker on how to configure the environment that runs your application.
The Dockerfile is then used to build an image with contains an OS, the dependencies, and code.
Once we get an image, we will then run a container which itself is an isolated package running the code.
To start, create a file called Dockerfile. The Dockerfile contains instructions which by convention, are all caps.
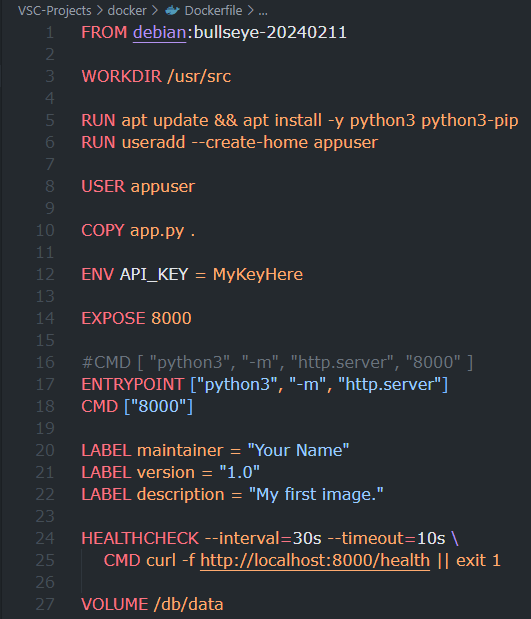
The following example will allow us to run a simple web server with python3:
FROM debian:bullseye-20240211

WORKDIR /usr/src

RUN apt update && apt install -y python3 python3-pip

RUN useradd --create-home appuser

USER appuser

COPY app.py .

ENV API_KEY = MyKeyHere

EXPOSE 8000

#CMD [ "python3", "-m", "http.server", "8000" ]

ENTRYPOINT ["python3", "-m", "http.server"]

CMD ["8000"]

LABEL maintainer = "Your Name"

LABEL version = "1.0"

LABEL description = "My first image."

HEALTHCHECK --interval=30s --timeout=10s \
	CMD curl -f [http://localhost:8000/health](http://localhost:8000/health) | exit 1

VOLUME /db/data
Screenshot:
Breakdown:
-
FROM - Specifies the base image. Usually a Linux image (Debian) in this example followed by a colon (:) to specify which version to use.
-
WORKDIR - Creates a source directory and change directory (cd) into it. This is where the source code will be placed. All commands executed past this part will be executed in the working directory.
-
RUN - Similar to running commands on Linux, we can use this to install all the dependencies that we need. This instruction allows us to run any command.
-
USER - By default, we are running as the root user. For better security, we can create a non-root user with this instruction.
-
COPY - We can use this instruction to copy the code from our local machine to our image.
-
ENV - To run this code, we have an API key which can be set as an environment variable using this instruction.
-
EXPOSE - Makes an port accessible for external traffic. This instruction allows users to connect to the application.
-
CMD - Specifies the command we want to run when starting the container.
-
ENTRYPOINT - Alternatively, we can set this to pass commands when creating our container.
-
LABEL - This allows us to add some information to the image. This is not required for an image to function.
-
HEALTHCHECK - Allows us to perform a health check on the container to ensure that it is running properly.
-
VOLUME - Allows us to store data by mounting a volume to it. This instruction will allow for persistent data.
Build a Docker Image
Once the Dockerfile is created, we can use the following command to turn it into an image:
docker build . -t MyFirstImage
The -t flag allows us to tag the image with a name in this case, MyFirstImage.
In addition, we can add some files that we do not want a Docker image. To do this, we can create a file called dockerignore.
Creating a Container
To create a container, we can use the following command:
docker run MyFirstImage
Once the container is created, we can access it via port 8000 which was exposed earlier during the Dockerfile creation.
Some useful flags to use when creating Docker containers are:
| Flag | Purpose |
|---|---|
| -d | Run in detached mode. |
-p HOST_PORT:CONTAINER_PORT/-p 8080:80 | Maps the host port to the container port. In this example, it will map port 8080 of the host to port 80 inside the container. |
| --name=NAME_HERE | Gives the container the specified name. |
| --restart=no/always/on-failure/unless-stopped | Specifies the restart policy. By default, this is set to "no". "always" is usually used to auto start containers. |
-v VOLUME_NAME/--mount=/path/to/dir/here/on/host | Attaches a volume to the container for persistent storage. |
The above flags are optional but can make identifying, managing, and networking containers easier.
Managing Containers
Some useful commands for managing Docker containers are:
| Command | Purpose |
|---|---|
| docker ps | Lists all Docker containers. Similar to running the ps command in Linux. |
| docker stop Container_Name_Here | Stops (shutdown) a container gracefully. |
| docker kill Container_Name_Here | Forcefully stop a container. |
| docker remove Container_Name_Here | Removes a container. |
| docker pull Image_Name_Here | Downloads a Docker image from places such as Docker Hub. |
Docker Networking
Docker provides a couple drivers to manage and provide networking functionality. The below table will list the available driver types and their purpose:
| Driver Name | Description |
|---|---|
| Bridge | The default network driver. |
| host | Remove network isolation between the container and the Docker container. Think of it as attaching the container physically onto the network. |
| none | Isolate the container from the host and other containers. |
| overlay | Overlay networks connect multiple Docker daemons together. |
| ipvlan | Ipvlan networks provide full control over both IPv4 and IPv6 addressing. |
| macvlan | Assign a MAC address to a container. |
To create a network, we can use the following command:
docker network create NETWORK_NAME_HERE
An example will be:
docker network create internal_net
To assign the container to a specified network, we can use the switch --network NETWORK_NAME_HERE. An example will be:
docker run -p 8080:80 --network internal_net --name simple-web nginx/nginx:latest
Command breakdown:
-p 8080:80- Maps port 8080 of the host machine to port 80 in the container.--network internal_net- Assigns the "internal_net" network to the container.--name simple-web- Gives the container the name "simple-web"nginx/nginx:latest- Specifies the image to use. In this case, the latest version of nginx.