Basic Workflows
This section will cover some basic workflows using the command line.
Table of Contents
- Introduction
- System Information
- Navigating the File System
- Working with Files and Directories
- Creating a File or Directory
- Viewing the Directory Structure
- Renaming, Moving, and Copying Files and Directories
- Locating Installed Programs
- Finding Files and Directories
- Editing Files
- File Descriptors and Redirectors
- Filtering Contents
- Reading Files
- Sorting File Contents
- Filtering and Formatting Results
- Regular Expressions
- Managing Permissions
- SUID and GUID
- Sticky Bit
Introduction
It is crucial to know how to work within the Linux shell as most servers are based on Linux. Another reason is that knowing how to use the operating system to control it requires understanding the Shell.
Note that the commands used in this section are tested on Debian. Other distributions may differ slightly.
System Information
Below are some useful commands that can display different system information on Linux.
| Command | Description |
|---|---|
| whoami | Returns the current user. |
| id | Returns the user identity. |
| hostname | Set or returns the name of the current host machine. |
| uname | Returns basic information about the operating system and system hardware. |
| pwd | Returns the current working directory. |
| ifconfig/ip a | Returns network interfaces and configurations. |
| ip | Used to configure network interfaces manually. |
| netstat | Returns network status. |
| ss | Used to investigate sockets. |
| ps | Returns process status. |
| who | Displays who is logged in. |
| env | Returns environment or sets and executes command. |
| lsblk | List block devices. |
| lsusb | List USB devices |
| lsof | List opened files. |
| lspci | List PCI devices. |
Some examples of the above commands:

Navigating the File System
The following commands will be covered here:
| Command | Description |
|---|---|
| cd | Change the current working directory. |
| ls | List the contents of the current/specified directory. |
To navigate, we can use the cd (change directory) command in Linux by providing the directory name or path to the directory. To return to the home directory, we can use the tilde (~), which represents the home directory.
cd <directory_name>
cd /path/to/dir
cd ~
An example will be where we want to be in the mydir directory:
cd mydir
To move "up" a directory, we can simply use cd ../. Using the pwd (print working directory) command, it allows us to see the current directory we are in (current working directory).
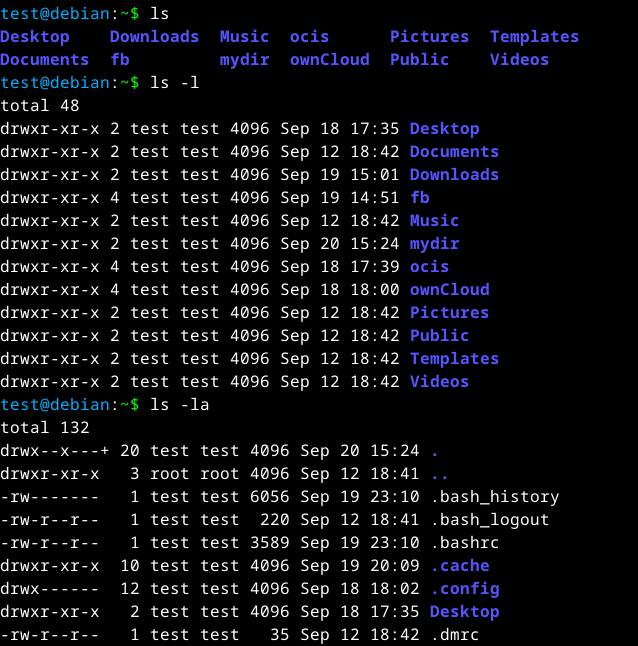
To list the files in the current directory, we can use the ls command. Options such as -l (long list) provides more information, -a (all) list all contents including hidden ones, and -la, a combination of -l and -la.
ls
ls -l
ls -la
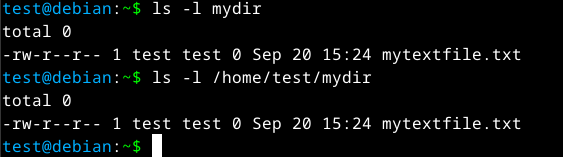
It can also be used to list the contents of other directories by providing the relative or full path.
ls -l mydir
ls -l /home/<username>/mydir
When using the -l command, we can see information such as permissions and owner for the file and directories. The following table will list the structure.
| Column | Content | Description |
|---|---|---|
| 1 | drwxr-xr-x | The type (d) and the permissions (rwxr-xr-x). |
| 2 | 1 | Number of hard links to the file/directory. |
| 3 | test | The owner of the file/directory. |
| 4 | test | The group owner of the file/directory. |
| 5 | 4096 | The size of the file or the number of blocks used to store the directory information in bytes. |
| 6 | Sep 18 17:35 | Date and time. |
| 7 | Desktop | The name of the file/directory |
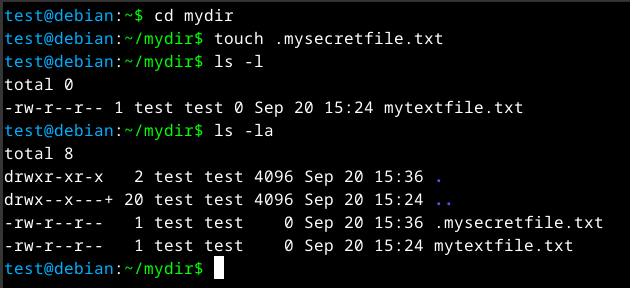
Hidden files can be identified by the period (.) at the start of the file or directory name. The same method can be used to create a hidden file. Hidden files can be viewed by using the -a option with ls.
touch .<file_name>
ls -la
Working with Files and Directories
The following commands will be covered here:
| Command | Description |
|---|---|
| touch | Create a file. |
| mkdir | Create a directory. |
| tree | View the directory's structure. |
| mv | Move or rename files/directories. |
| cp | Copy files/directories. |
| which | Used to determine if specific programs are available on the system. |
| find | Used to locate the specified file/directory. |
| locate | Used to locate the specified file/directory. |
Note that in Linux, names such as files or directories are case-sensitive.
Creating a File or Directory
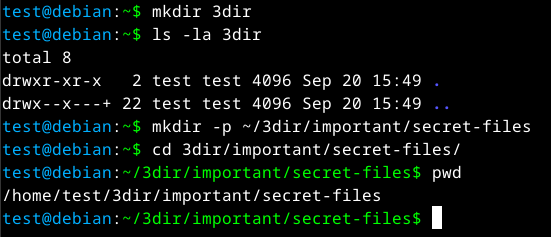
To create a file, we can use the touch <file_name> command. To create a directory, we can use the mkdir <dir_name> command.

If we want to have specific directories in a existing directory, we can use the -p option when using mkdir to add parent directories if it doesn't exist. This can save time as we do not have to create each directory manually.
Viewing the Directory Structure
To view the whole structure, we can use the tree command.

Renaming, Moving, and Copying Files and Directories
To move or rename a file or directory, we can use the mv command.
mv <file/dir> /path/to/new/location/
mv <original_file/dir> <new_name_file/dir>
To copy files, we can use the cp command.
cp <file/dir> /path/to/copy/location/
Locating Installed Programs
If we want to search if a specific program is present, we can use the which command.
which <program_name>
An example will be looking if Python is installed.
which python
Finding Files and Directories
To look for files, we can use either the find or locate command.
find <location_to_search> <options>
locate <file/dir>
An example if we are looking for a specified file with .bak in its name:
find / -type f -name *.bak -user root -size +25k -size -30k -newermt 2024-01-02 2>/dev/null
The find command breakdown:
/- Specify the location to search. In this example, the root directory.-type f- Specify the type to file.-name *.bak- Specify the file name. In this case, all files with the.bakin its name.-user root- Specify the file owner.-size +25k- Specify that the file is bigger than 25 KiB.-size -30k- Specify that the file is smaller than 30 KiB.-newermt 2024-01-02- Specify that only files newer than the specified date.2>/dev/null- Redirect all errors to/dev/null.
Editing Files
To edit files from the command line, we can use text editors such as Vi, Vim, or Nano. This section will be using nano.
To edit a file, we can use the following command.
nano <file_name>
Next, we can simply type the contents that we want into the file. Once done, we can use ctrl + O to save the file and ctrl + X to exit the editor.
Note: The caret (^) stands for the ctrl key.
If we want to search for a word, we can use ^W and enter the characters that we want to search for. Once done, press the enter key to jump to the matches.
To view the file contents on the command line, we can use the cat command.
cat my-notes.txt
File Descriptors and Redirectors
File redirectors:
| Director | Description |
|---|---|
>/< | Redirect the output into the specified file. Overrides any content in the specified file. |
>> | Redirect the output to the specified file. Appends results to existing contents. |
| pipe | Redirects the output (STDOUT) from one command to be used by the next. |
A file descriptor (FD) in Linux operating systems is an indicator of connection maintained by the kernel to perform Input/Output (I/O) operations. In Windows, this is called filehandle.
By default, the first three file descriptors in Linux are:
- Data Stream for Input -
STDIN - 0 - Data Stream for Output -
STDOUT - 1 - Data Stream for Output that relates to an error occurring -
STDERR - 2
An example will be using the cat command.

We can see the text that we entered (in red) as STDIN and the text that is reflected (in green) as STDOUT.
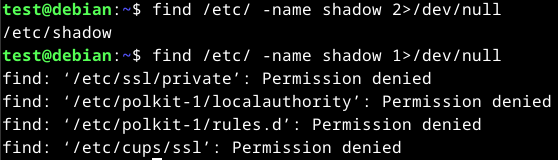
Another example will be using find. When looking for a file, if it returns an error such as Permission denied, it will be marked as standard error.

We can see the result highlighted in green as STDOUT and the result in red as STDERR. To visualise this, we can redirect the file descriptors.
find /etc/ -name shadow 2>/dev/null
find /etc/ -name shadow 1>/dev/null
The above commands will redirect all errors (STDERR - FD 2) and valid result (STDOUT - FD 1) to /dev/null respectively.
We can redirect standard out results to a file.
find /etc/ -name shadow 2>/dev/null > results.txt

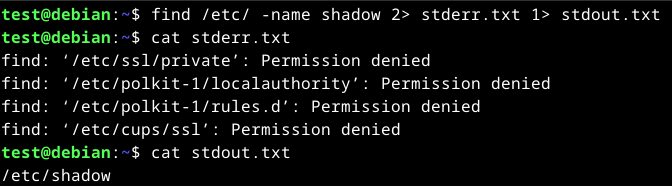
It is also possible to redirect STDOUT and STDERR to separate files.
find /etc/ -name shadow 2> stderr.txt 1> stdout.txt
It is also possible to redirect STDIN.
cat < stdout.txt
We can also use << to add our standard input through a stream with the End-Of-File (EOF) function in Linux, which defines an input's end.
cat << EOF > stream.txt

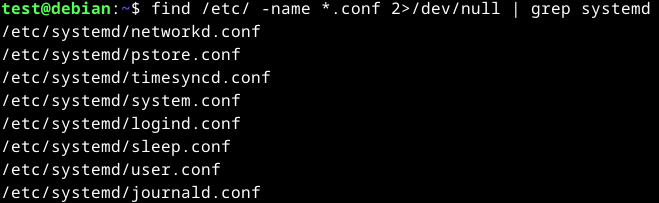
Another way to redirect STDOUT is to use pipes (|) to be processed by another program. An example will be using the find command with grep. Grep allows us to filter STDOUT according to the pattern we define.
find /etc/ -name *.conf 2>/dev/null | grep systemd
The above command will search the /etc/ directory for all files and folders that has .conf in their name while sending all standard errors (STDERR - FD 2) to /dev/null.
Once the find command is done executing, it will pass the standard output (STDOUT - FD 1) results to grep to list all outputs with systemd in it.
It is also possible to chain multiple redirections such as pipe. An example will be using wc (wordcount) to count the total number of results.

Filtering Contents
The following commands will be covered here:
| Command | Description |
|---|---|
| more/less | Display the contents of the file. |
| head | Display the first few lines of a file. By default, the first 10 lines. |
| tail | Display the last few lines of a file. By default, the last 10 lines. |
| sort | Used to sort the contents of a file. |
| grep | Used to filter results. |
| cut | Used to remove contents before/after specified delimiters. |
| tr | Used to replace text. |
| column | Used to format results in a column. |
| awk | Used to output the specified results from a single line. |
| sed | Used to find and replace results using regex. |
| wc | Used to count the number of words. |
Reading Files
To read the contents of the file, we can also use more or less if cat isn't available.
more <file_name>
less <file_name>
To view the first few or last few lines of a file, we can use head and tail respectively. By default, it will output 10 lines unless specified.
head <file_name>
tail <file_name>
Sorting File Contents
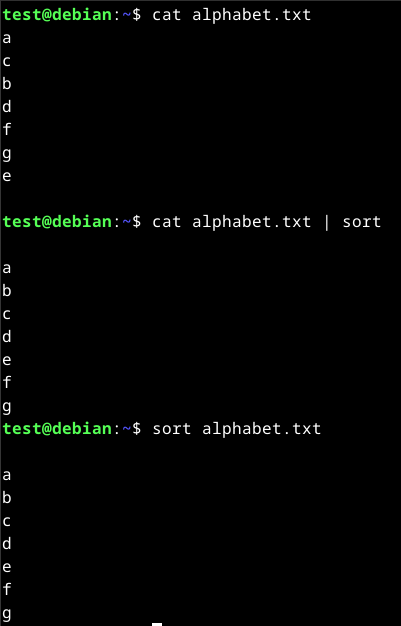
To sort the contents of a file, we can use the sort command. An example will be sorting it alphabetically or numerically.
cat <file_name> | sort
sort <file_name>
Filtering and Formatting Results
To search for a specified pattern, we can use grep. An example will be looking for the string /bin/bash to search for users with a default shell of /bin/bash.
cat /etc/passwd | grep "/bin/bash"

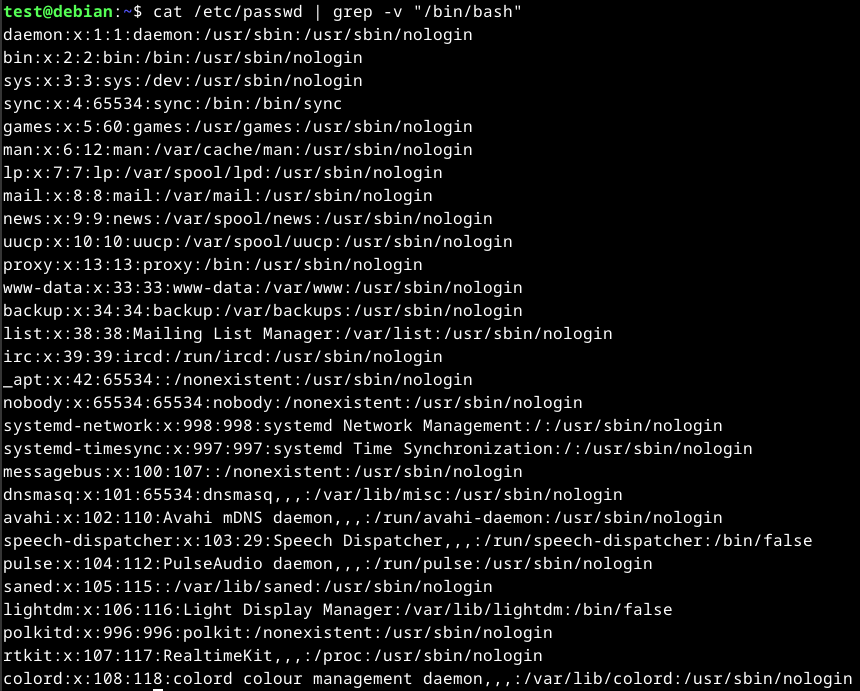
We can also exclude specific results by using the -v option with grep. An example will be to exclude all users with a shell of /bin/bash.
cat /etc/passwd | grep -v "/bin/bash"
We can use specify our results if different characters are separated as delimiters. We can use cut to specify a delimiter and position to output. Specifically, we can use the -d option to set the delimiter and -f to set the position to output.
cat /etc/passwd | grep "/bin/bash" | cut -d ":" -f 1
The above command will output the contents of /etc/passwd, pass it to grep and filter all users with a shell, and specify the delimiter to be colon (:) and output the first position.

To replace delimiters, we can use the tr command by specifying the delimiter and what to replace it with.
cat /etc/passwd | grep "/bin/bash" | tr ":" " "
The above command will output the contents of /etc/passwd, pass it to grep and filter all users with a shell, and replace the colon (:) with a space (" ").

The column command can be used to display the output in a column format.
cat /etc/passwd | grep "/bin/bash" | tr ":" " " | column -t

To specify which part of the line to output, we can use the awk command. An example will be outputting the first and last result of a line by using $1 and $NF respectively.
cat /etc/passwd | grep "/bin/bash" | tr ":" " " | awk '{print $1, $NF}'

To substitute or replace text, the sed command can be used to look for patterns using regular expressions (regex). An example will be replacing the word bin in /bin/bash with shell.
The s flag in the sed command stands for substitute at the beginning followed by the pattern to be replaced in the second position. After the slash (/), we then enter the replacement in the third position and end it with the g flag which stands for replacing all matches.
cat /etc/passwd | grep "/bin/bash" | tr ":" " " | awk '{print $1, $NF}' | sed 's/bin/shell/g'

To count the number of words or characters in a output, the wc command can be used. An example will be counting how many lines are returned with users that has a shell.
cat /etc/passwd | grep "/bin/bash" | wc -l

Regular Expressions
Regular expressions (regex) can be used to search for patterns in text and files. They can be used to find and replace text, analyse data, validate input, perform searches, and more.
A regex is a sequence of letters and symbols that form a search pattern. Regex can also be created with patterns called metacharacters. Meta characters are symbols that define the search pattern but have no literal meaning.
Regex allows us to group search patterns. To do this, it follows three different concepts, which are distinguished by three different brackets.
| Operators | Description |
|---|---|
(a) | Round brackets are used to group parts of a regex. Patterns can be further defined within this brackets which should be processed together. |
[a-z] | The square brackets are used to define character classes. We can specify the list of characters to search for. |
{1-10} | The curly brackets are used to define quantifiers. We can specify a number or range that indicates how often a previous pattern should be repeated. |
pipe (|) | The pipe is called an OR operator and shows results when one of the two expressions matches. |
AND (.*) | The .*, called the AND operator, can be used to display results only if both expressions match. |
An example will be where we are looking for the word bash or root. In grep, we can use the -E option to use regex.
grep -E "(root|bash)" /etc/passwd

Another example will be searching for lines with root and bash using the .* (and) regex.
grep -E "(root.*bash)" /etc/passwd
![]()
Managing Permissions
Permissions are assigned to users and groups. Each user can be a member of different groups, and membership in these groups can give the user specific, additional permissions.
Each file and directory belongs to a specific user and group. If we create a file, it will belong to us and the group that we belong to.
To access the contents of a directory in Linux, the users will need to traverse (navigate) to the directory and require the execute permissions on the directory. Without the execute permissions, the user will be returned a "Permission Denied" error message.
The permission system is based on an octal number system with three different types of permissions that can be assigned:
- r - Read
- w - Write
- x - Execute
To view the permissions of a file or directory, we can use ls -l.

The following is a breakdown on how to read the permissions.
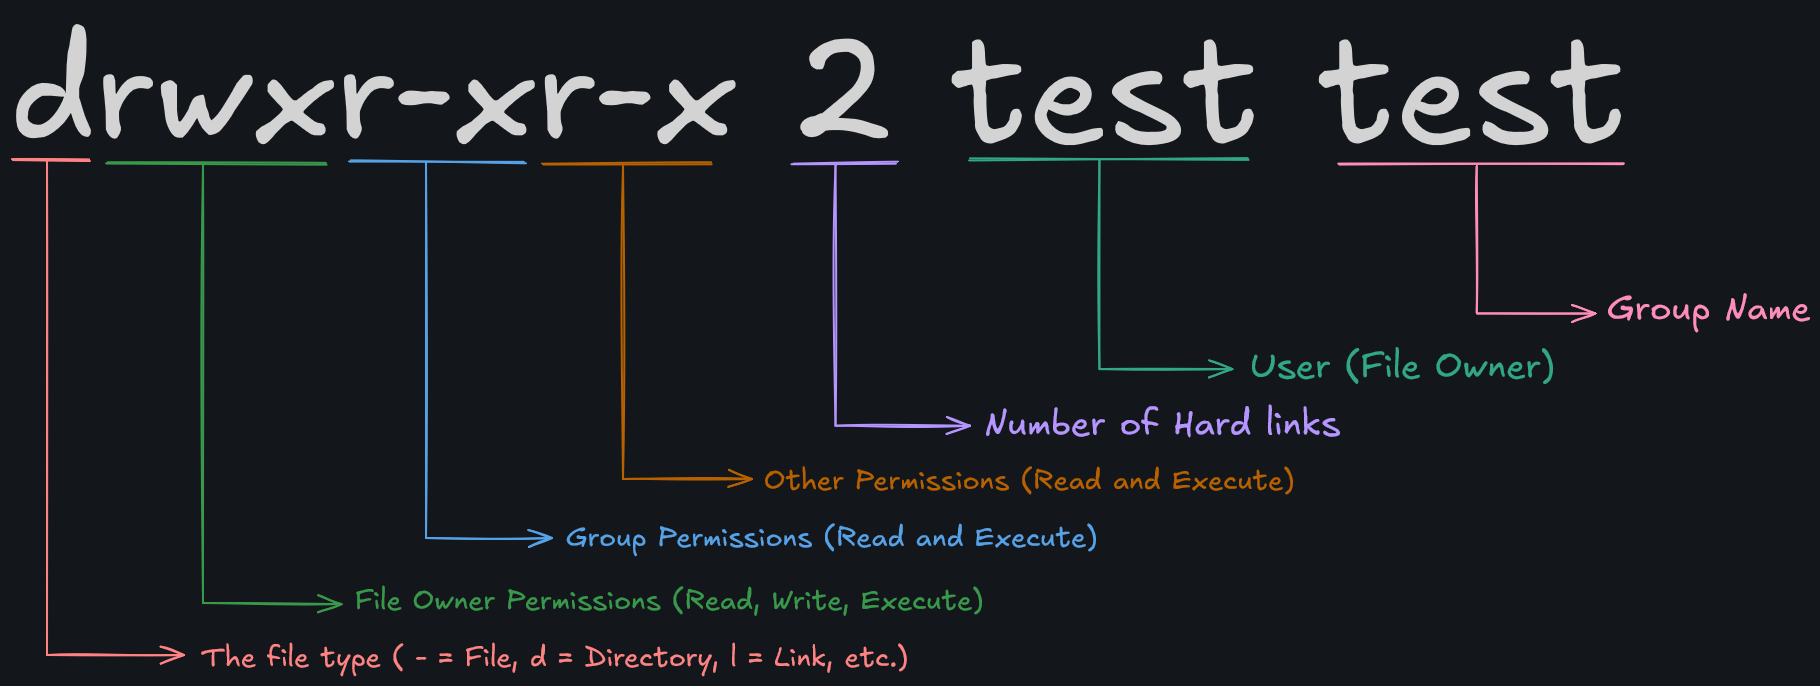
We can see that it is split into four distinct parts. The file type, file owner permissions, group permissions, and other permissions.
The file type defines the type of file it is. An example will be d which stands for directory or - which stands for file.
The file owner permissions define the permissions of the user that created the file.
The group permissions define the permissions for the group that owns the file.
The other permissions defines the permissions for other user and groups.
There are 8 different possible permissions that can be assigned to a file. Each with their own number:
| Number | Permissions | Binary |
|---|---|---|
| 7 | Read, Write, Execute | 111 |
| 6 | Read, Write | 110 |
| 5 | Read, Execute | 101 |
| 4 | Read | 100 |
| 3 | Write, Execute | 011 |
| 2 | Write | 010 |
| 1 | Execute | 001 |
| 0 | None | 000 |
To change the permissions of a file or directory, we can use the command chmod. We will need to specify 3 digits, each corresponding to file owner, group, and others permissions respectively.
chmod 777 <file/dir name>
The above command will set the file owner, group, and other permissions read, write, and execute.
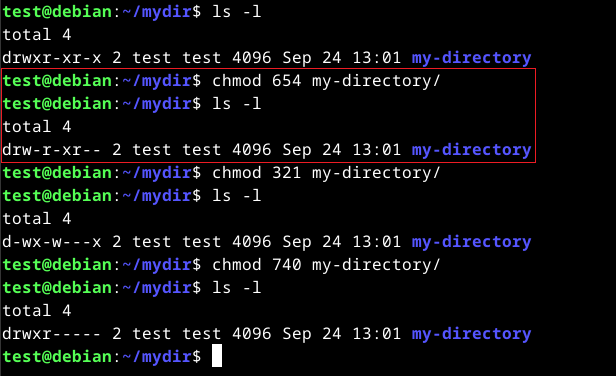
Another example will be 654, which will set file owner to read and write, group to read and execute, and others to read only.
chmod 654 my-directory
Alternatively, we can use permission group references (u - owner, g - group, o - others, a - all users) and either a plus (+) or minus (-) to add or remove the designated permissions.
chmod g+x <file/dir name>
The above command will add the execute permissions for the group.
To change the owner of a file or directory, we can use the following.
chown <user>:<group> <file/dir>
Replace <user> and <group> with the new owners.
SUID and SGID
Special permissions can also be set by setting the Set User ID (SUID) and Set Group ID (SGID) bits. These bits allow, for example, users to run programs with the rights of another user.
An example will be an administrator giving users special rights for certain applications or files. The letter "s" is used instead of an "x". When executing the application or file, the SUID/SGID of the file owner is used.
However, this is a high security risk as such applications may contain functions that allow the execution of a shell from the pager such as the journalctl application.
If the administrator sets the SUID bit to journalctl, any user with access to the application could execute a shell as the root user.
Sticky Bit
Sticky bits are a type of file permissions that can be set on directories. It provides an extra layer of security when controlling the deletion and renaming of files within a directory. It is usually used on directories that are shared with multiple users to prevent one user from accidentally deleting or renaming files that are important to others.
An example will be where an administrator set the sticky bit on a shared directory to ensure that only the owner of the file, the owner of the directory, or root user can delete or rename files within the directory.
When a sticky bit is set, it is represented by the letter t in the execute permissions. For example, if a directory has rwxrwxrwt, it means that the sticky bit is set.
If a sticky bit is a capital T, this means that all other users do not have execute permissions and, therefore, cannot see the contents or run any programs in the directory. If it is a lowercase t, it means that execute permissions have been set.