SNMP - Simple Network Management Protocol
This section will cover ways to enumerate Simple Network Management Protocol (SNMP).
Table of Contents
- Overview
- Default Configuration
- Dangerous Settings
- Enumerating SNMP
- SNMPwalk
- OneSixtyOne
- Braa
Overview
Simple Network Management Protocol (SNMP) was created to monitor network devices. SNMP is also able to handle configuration tasks and change settings of the devices it is managing remotely.
SNMP-enabled hardware can include devices such as routers, switches, servers, IoT devices, and many more. These devices can be queried and controlled using SNMP. The current version of SNMP is SNMPv3, which has increased security when compared to previous versions and the complexity of using the protocol.
SNMP transmits control commands using agents over UDP port 161. The client can set specific values in the device and change options and settings with these commands.
SNMP also uses traps over UDP port 162. These are data packets sent from the SNMP server to the client without being explicitly requested. If a device is configured accordingly, a SNMP trap is sent to the client once a specific event occurs on the server-side.
There are two main components to SNMP:
- Management Information Base (MIB)
- Object Identifier (OID)
The MIB is an independent format for storing device information. A MIB is a text file in which all SNMP objects that can be queried of a device are listed in a standardise tree hierarchy. It contains at least one OID, which can contain more information such as an unique address, name, and other types of device information.
The OID represents a node in a hierarchical namespace. A sequence of numbers uniquely identifies each node, allowing the node's position in the tree to be determined. The longer the chain, the more specific the information is.
Think of the MIB as a database with the OID being the entries.
There are 3 main versions of SNMP.
| SNMP Version | Description |
|---|---|
| SNMPv1 | The first version of SNMP. It has no built-in authentication mechanism. This means that anyone accessing the network can read and modify the data. SNMPv1 also does not support encryption. |
| SNMPv2 | There are 2 versions of this. SNMPv2 and SNMPv2c. The "c" stands for community-based. A community is like a "password" to access the device. SNMPv2 still does not provide any encryption support. |
| SNMPv3 | The security is increased greatly in this version will authentication and encryption when transmitting data. |
Default Configuration
The default configuration of the SNMP daemon defines the basic settings for the services. Some such information includes:
- IP addresses
- Ports
- MIB
- OIDs
- Authentication
- Community Strings
The configuration file is located in /etc/snmp/snmpd.conf.
Dangerous Settings
The below table will list some dangerous settings associated with SNMP.
| Setting | Description |
|---|---|
| rwuser noauth | Provides full access to the OID tree without authentication. |
rwcommunity Community_String IPv4_Address/rwcommunity6 Community_String IPv6_Address | Provides access to the full OID tree regardless of where the requests were sent from. |
Enumerating SNMP
Some tools we can use to enumerate SNMP are snmpwalk, onesixtyone, and braa.
SNMPwalk
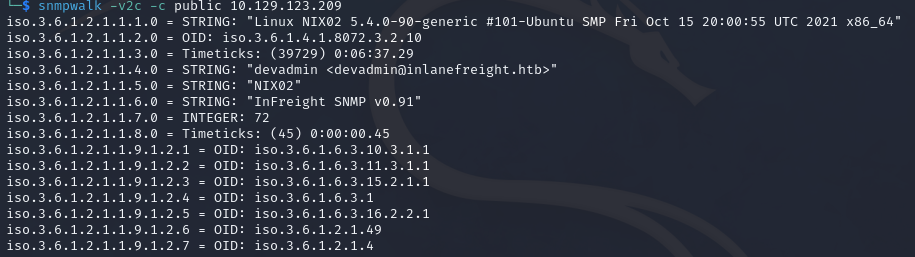
To use snmpwalk, we can use the following command:
snmpwalk -v2c -c public 10.42.0.20
Command breakdown:
-v2c- Specify the SNMP version.-c public- Specify the community string. In this casepublic.10.42.0.20- Specify the target IP address.
In the event of a misconfiguration, we will be able to obtain the entire MIB. Once we have identified that the service does not require authentication (v1, v2c), we can query internal systems using the previous command.
OneSixtyOne
If we do not know the community string, we can use onesixtyone and a wordlist to identify the strings.
onesixtyone -c main/wordlists/seclists/Discovery/SNMP/snmp.txt 10.129.123.209
Command breakdown:
-c main/wordlists/seclists/Discovery/SNMP/snmp.txt- Specify the wordlist to use.10.129.123.209- Specify the target IP address.

Braa
Once we have identified a community string, we can use braa to brute-force the individual OIDs and enumerate the information associated with them.
braa cstring@10.42.0.1:.1.3.6.*
Command breakdown:
cstring- Specify the community string.10.42.0.1- Specify the target IP address..1.3.6.*- The OID. The asterisk specifies braa to retrieve all OID that starts with.1.3.6.